Skip to content

Citrix

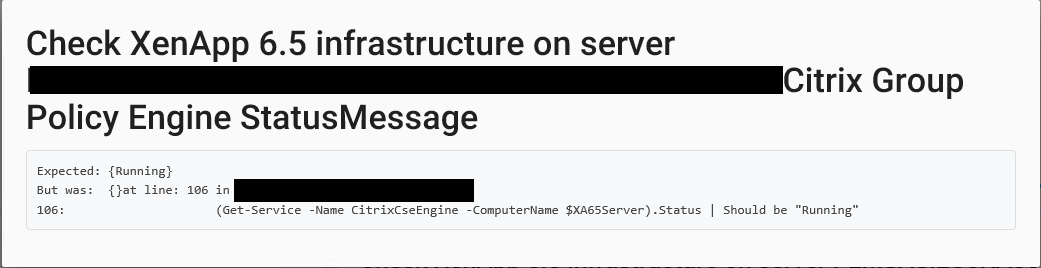
Profile Management – Part 1

Hi,

Recently I had a poll on Twitter asking what my next subject should be here on the blog, and the winner was profile management. I like that subject because it lays the ground for so many things in the user experience in any work scenario containing IT, and thereby also Citrix which I spend a lot of my time on.

In this first part I will list some of the deciding points when choose type of profile and which options I will be testing in this blog series.

Profile types

First let’s have a look at what type of profiles we can choose from:

  • Local
  • Roaming
  • Mandatory
  • Hybrid

If we look at the capabilities of each type we get this (From the Citrix VDI handbook)Skærmbillede 2017-07-02 kl. 22.43.11.png
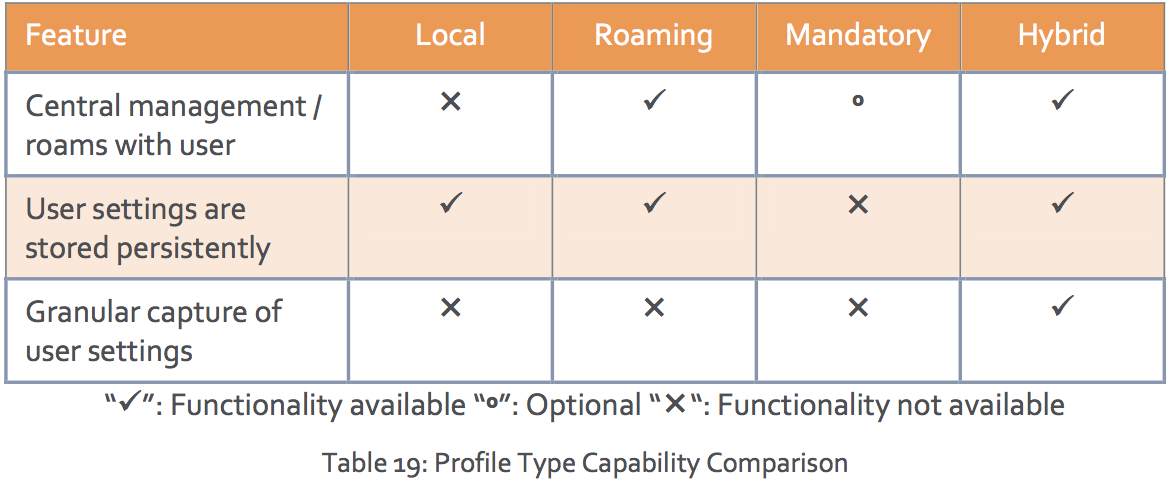
I have personally used Roaming, Mandatory and Hybrid in the Citrix deployments I have been involved in, but 99,9% for me has been either Roaming or Hybrid. If we look at what Citrix recommends using in the deployments we see out there we get this (Again from the Citrix VDI handbook)Skærmbillede 2017-07-02 kl. 22.53.03.png
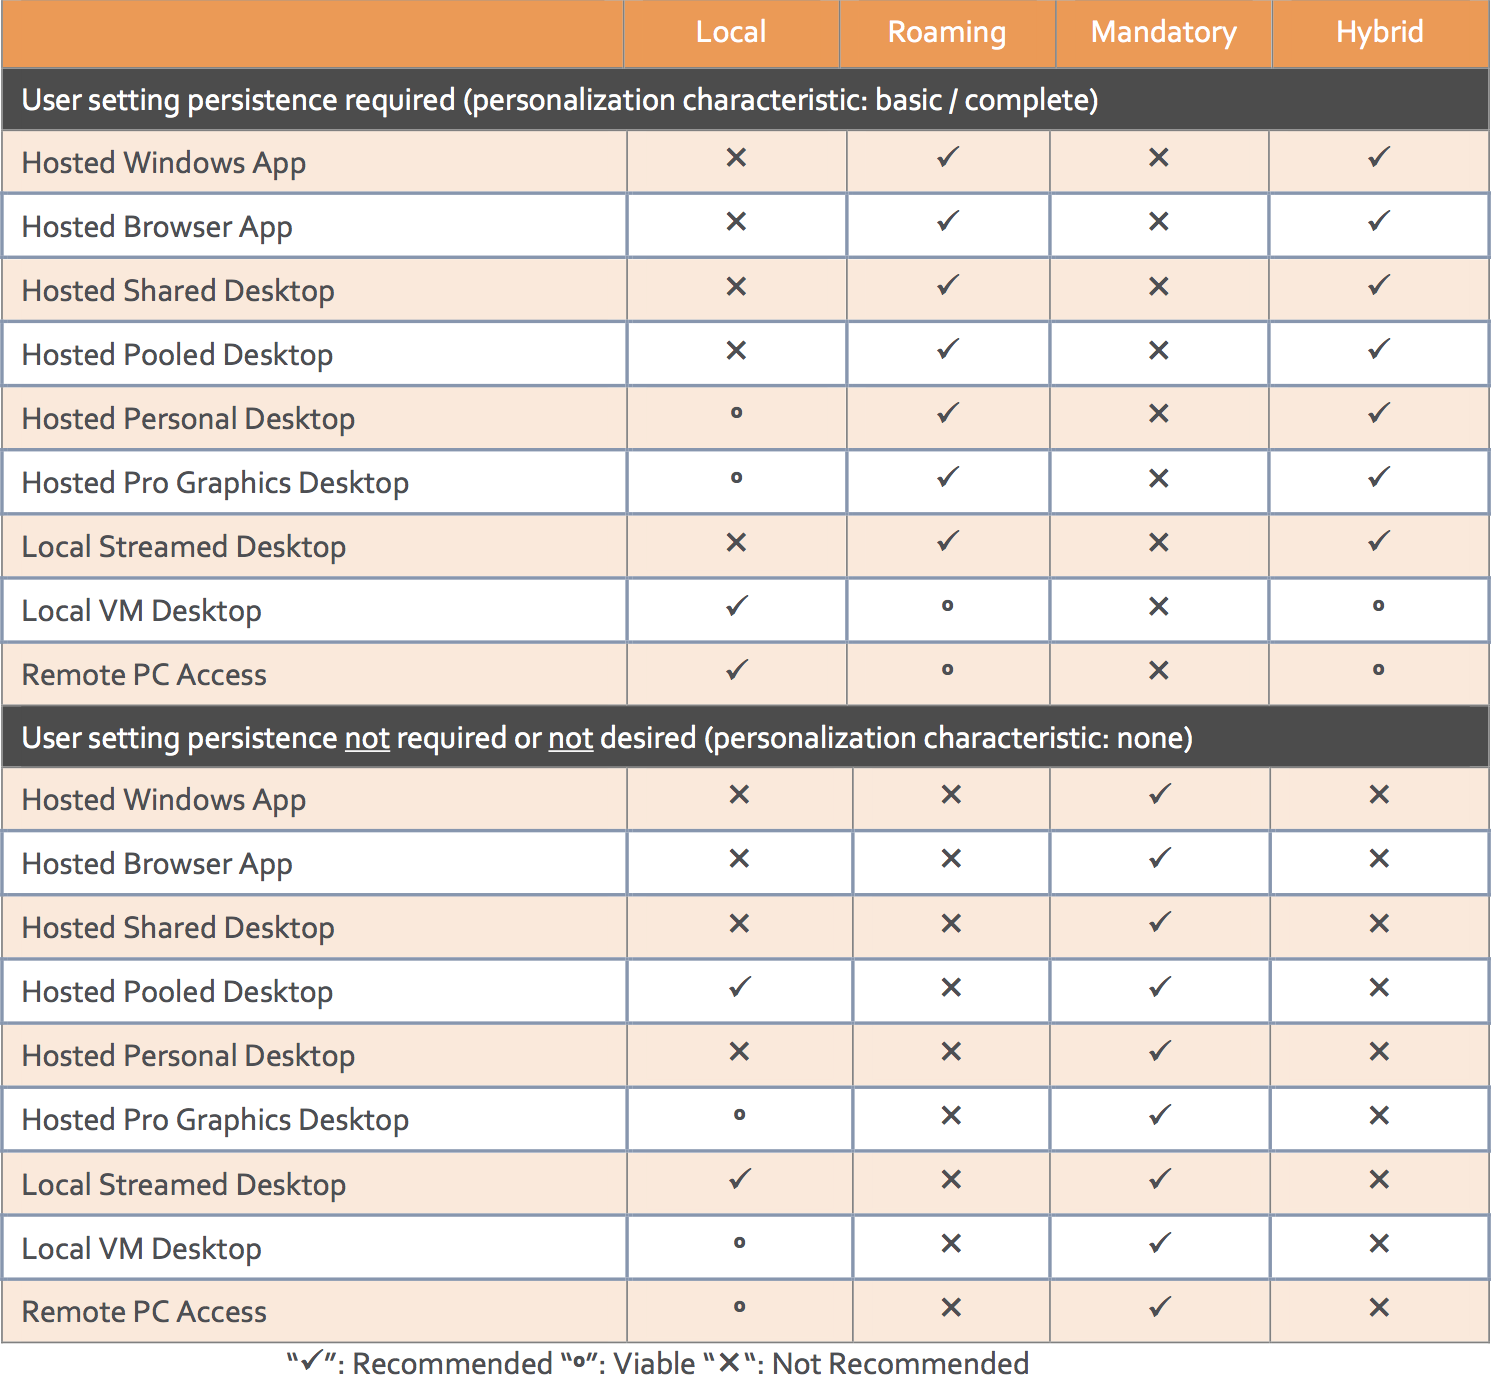
As we can see from the table above Citrix recommends roaming or hybrid profiles for almost all deployments that needs user settings persistence. This doesn’t come as a surprise since we need a consistent experience for our users. On the flip side, mandatory profiles are almost the only recommended solution for none persistent user settings.

An example on a hybrid user profile is Citrix User Profile Management. The meaning of a hybrid profile is that you can include and exclude just about any part of the user profile based on what you need, this could be registry keys, files or folders.

Folder redirection

Another big part of the user experience and profile management is the folder redirection part. We use folder redirection to reduce the size of the profile but still have persistence in those folders. When we look at what the Citrix VDI handbook recommends in this area we get this:Skærmbillede 2017-07-02 kl. 23.03.44.png
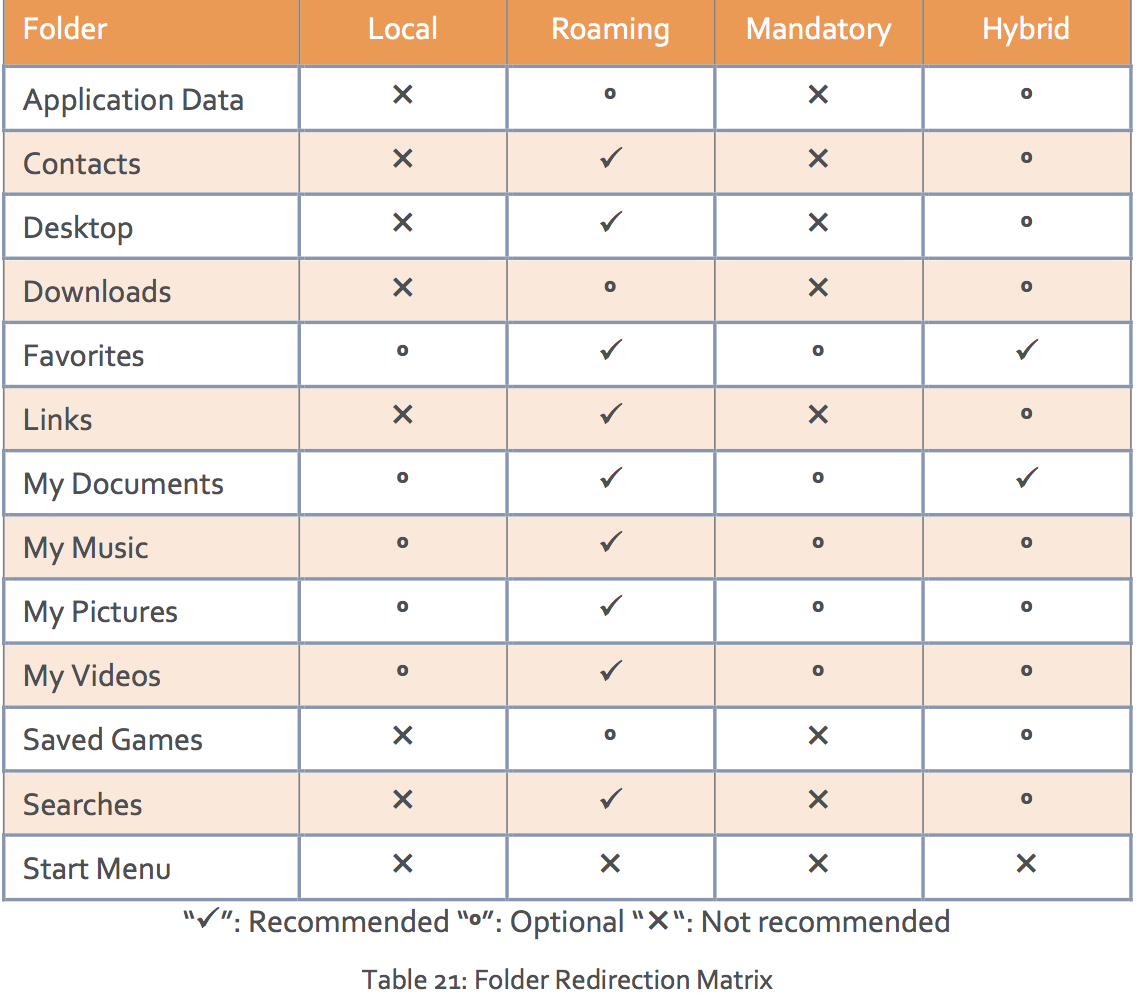
I quite often follow the recommended roaming settings for both roaming and hybrid profiles. I agree to a most of the listed from Citrix but the “Favorites” marked as recommended is something I don’t quite get. From my point of view this should be marked as an option and could often be left in the profile since in most cases we are talking about a small number of files and small size so keeping them in the profile should be fine. Another point about the favorites is that it seems that every time you write a letter in the URL bar in internet explore a call will be made to the file server over the network and thereby putting a lot of load onto network and file server.

My recommendations

My recommendations to profile management isn’t much different from a lot of others out in the community, you need to analyze, access, test and test again. My standard setup that I normally start out with looks like this:

  • Roaming or hybrid profile (if FSLogix is not an option)
  • Folder redirection for
    • Desktop
    • Downloads
    • My Documents (with music, pictures, videos to follow documents)

Next part of the series will be about

The next part of this blog series will be about the products and digging a bit deeper into each of the solutions I am going to test later. The products I will be digging into is Microsoft Roaming Profiles, Citrix Profile Management and FSLogix, ironically these are all different types of profiles, but can be used for a lot of the same scenarios.

Pester for XenApp 6.5

Hi,

I am currently working on a project where we are building a new XenApp 6.5 environment (Yes, we know it’s not the best idea, but there are reasons). For this project with need to hand in an operational acceptance test (OAT) and part of that is showing that the infrastructure is working as expected. After watching a youtube video from PSConf.eu (https://www.youtube.com/watch?v=Qy-uvT57pt8 I was inspired to use Pester as the base for doing the infrastructure server tests. Of course, there is more to the OAT but I won’t look into that is this post.

For those of you that has never heard about Pester it is basically a “tool” that will test your PowerShell code and alert you of anything in the code that doesn’t behave as you intend. If you really want to dig into PowerShell coding you should start with writing your Pester tests and then your PowerShell code afterwards. This force you to think about what you want to achieve and create the tests for it before you write the code doing it. You can read more about Pester here: https://github.com/pester/Pester/wiki/Pester

After watching the video from Rob I started right away on building my Pester tests so much of my evenings this week has gone with this. Writing a Pester test isn’t that hard and doesn’t take much time, but finding out what to test and how to test it can take a bit of time.

So, what did I do to get started with Pester?

As stated I watched the video on youtube and then I found this post by Adam Bertram: https://mcpmag.com/articles/2016/12/01/create-a-simple-pester-test-report.aspx

After that I made a list over the infrastructure roles I wanted to test, my list looks like this:

Citrix XenApp 6.5 Zone Data Collector

Citrix XenApp 6.5 Worker

Citrix StoreFront

Citrix PVS

Microsoft App-V

My next step was to examine the services running on the infrastructure servers and note down the display name and name of each service.

For each of these services I created a Pester test looking like this:

it "Citrix PVS Soap Server" -Skip:$ServerAlive{
                (Get-Service -Name soapserver -ComputerName $PVSServer).Status | Should be "Running"
}

Since I wanted to be able to separate the roles I created loops for each role and feeding all servers from a specific OU into these loops. The base is looking like this:

Foreach ($PVSServer in $PVSServers) {
    If (Test-Connection -ComputerName $PVSServer -ErrorAction 0 -Count 1 -Quiet) {
        $ServerAlive = $false
    } Else {
        $ServerAlive = $true
    }
    Describe "Check Citrix Infrastructure on $PVSServer" {
        Context "Citrix PVS" {
            it "Citrix PVS Soap Server" -Skip:$ServerAlive{
                (Get-Service -Name soapserver -ComputerName $PVSServer).Status | Should be "Running"
            }
            it "Citrix PVS Stream Service"  -Skip:$ServerAlive {
                (Get-Service -Name StreamService -ComputerName $PVSServer).Status | Should be "Running"
            }
            it "Citrix PVS Two-Stage Boot Service"  -Skip:$ServerAlive {
                (Get-Service -Name PVSTSB -ComputerName $PVSServer).Status | Should be "Running"
            }    
        }
    }
}

I quickly found out that I can just settle for services, I need to have at least open ports and registry settings in the Pester tests as well. You can see the examples below:

it "Port 1494 is open" -Skip:$ServerAlive {
                    (Test-NetConnection -ComputerName $XA65Server -Port 1494).TcpTestSucceeded | should be "True"
}
it "Initial database name" -Skip:$ServerAlive {
                    $Reg = [Microsoft.Win32.RegistryKey]::OpenRemoteBaseKey('LocalMachine',$XA65Server)
                    $KeyPath = 'software\policies\Citrix\ima\database settings'
                    $CitrixDatabaseName = $Reg.OpenSubKey($KeyPath)
                    $CitrixDatabaseName = $CitrixDatabaseName.GetValue('InitialDatabaseName')
                    $CitrixDatabaseName  | Should be $InitialDatabaseName
}

All this combined has made up what I am needing right now, but I am sure that I will find more tests I want to implement in this XenApp 6.5 environment so this post might be updated later as well.

The last part of the Pester setup for me was to create a nice report that I can show to the project manager so that he knows that has been tested and what the status is. For instance, I know there are errors in the environment, but they should not be fixed right now. Putting it into a report was easy, but I had some trouble getting the EXE file needed. The EXE file is for ReportUnit (http://reportunit.relevantcodes.com) but their download didn’t work for me so I was in luck that the community is there because Rob Sewell @sqldbawithbeard send the EXE to me and in 5 mins the report was ready.

The report looks like this and it is awesome if I should say so!Screenshot_4

If we look a bit deeper in the HTML report you can see both skipped and failed tests. The skipped tests are because I first test if the server is online, if it isn’t I skip the tests that were meant to run on it. The failed attempts speak for themselves and you can see below one of the tests that are failed. Screenshot_2.png

Screenshot_1.png

This was a short intro into how I got started with Pester. In the future I am sure I will create the same tests for XenApp 7.x and the surrounding components. If you are interested in these let me know.

/Martin

Setting up Amazon Alexa with Citrix Octoblu

Hi all,

When I was in the US for Synergy with my family I got an Amazon Echo Dot in birthday present. I wanted to get one of these to use with Citrix Octoblu so now that I am home again I have spent some time getting it to work and yesterday I finally got it working as I wanted to. The first things I have done with it is to turn on my Sonos speaker, set the volume and turn it off. I have also done a few things with Phillips Hue, but that will be expanded a bit soon.

In this small guide, I want to do a visual guide on how to set up the integration between Alexa and Octoblu since the guides I found was in writing only and I had a few problems making it work. I have created the guide to first do the work in Octoblu to create the “thing” that you need, then set up Alexa with the information needed there and lastly test it out with a flow in Octoblu.

I did use this guide from Github myself, but I felt that I was missing some information and it took quite some tries to get it working, but without it I would have been really lost 🙂 https://github.com/octoblu/alexa-service#creating-custom-skill

UPDATE: Thanks to Dave Brett I have done an update to the article. I is a requirement to have the same language on Alexa and the Alexa skill, so I have added a few screenshots to show those settings.

Getting the language you set up Alexa with

  1. Go to http://alexa.amazon.com/
  2. Click on “Settings” Skærmbillede 2017-06-12 kl. 17.13.48
  3. In the “General” section note the “Language” setting. The Alexa skills needs to match this one, so if you want to change from UK to US English or vice versa do it now by clicking on the “English (United States)” and selecting the language of your preference.Skærmbillede 2017-06-12 kl. 17.14.03.png

Creating the “thing” in Citrix Octoblu

  1. Go to https://app.octoblu.com/ and sign up for an account if you don’t have one already
  2. Click on “Things” Skærmbillede 2017-06-11 kl. 14.04.18
  3. Click on “All Things”Skærmbillede 2017-06-11 kl. 14.04.34
  4. On the top right enter “Oauth” in the search field and click on the “OAUTH APPLICATION” that is shown under “Octoblu” section. Skærmbillede 2017-06-11 kl. 14.05.15
  5. Click on “Connect oauth application” Skærmbillede 2017-06-11 kl. 14.05.38
  6. Make sure it says, “Register a new thing” and give it a name and then click on “Connect oauth application”Skærmbillede 2017-06-11 kl. 14.05.54
  7. When created go to “My Things” section and click on the oauth application you just created. Skærmbillede 2017-06-11 kl. 14.06.09
  8. For setting up Alexa you will need the UUID and a Token from this page. You can either keep it open or copy/paste the information into notepad or whatever app you use for notes. So, when you have the UUID click on “Generate Token” Skærmbillede 2017-06-11 kl. 14.06.26
  9. Note down the token number so you have it for later use in AlexaSkærmbillede 2017-06-11 kl. 14.06.35
  10. Give the app a name, and note that the “CallbackUrl” will be filled later.Skærmbillede 2017-06-11 kl. 14.06.58
  11. Click on “Permissions” and set “Can be discovered by” to “Everything”Skærmbillede 2017-06-11 kl. 14.07.10
  12. This concludes the first setup needed, now it is time to set up an Alexa skill.

Setting up an Alexa skill

  1. Go to https://developer.amazon.com/ and login with you Amazon account (you should have one since you have an Amazon Echo Dot.
  2. Click on the “Alexa” tab.Skærmbillede 2017-06-11 kl. 14.32.19.png
  3. Click on “Get Started” under the “Alexa Skills Kit” section. Skærmbillede 2017-06-11 kl. 14.33.31.png
  4. Click on “Add a new skill”Skærmbillede 2017-06-11 kl. 14.35.13.png
  5. Choose you language for the skill, this has to be the same as what we saw in the first part of this guide. In my case I have selected “English (U.S.)”, other choises are shown on a screenshot below, but remember to have the same on Alexa and the Alexa skill.Skærmbillede 2017-06-12 kl. 17.12.16Skærmbillede 2017-06-12 kl. 17.12.22.png
  6. On the first page, you must name your skill and you need to set the “Invocation name”. The invocation name is the name you use when activating Alexa”, in my setup it will work like this: “Alexa ask octoblu”Skærmbillede 2017-06-10 kl. 16.45.17.png
  7. The “Intent schema” is in JSON format and the content is pasted in from the guide I mentioned in the start of my own guide. Below is both a picture of the schema and the code I have used. { "intents": [ { "slots": [ { "name": "Name", "type": "TRIGGER" } ], "intent": "Trigger" }, { "intent": "ListTriggers" }, { "intent": "AMAZON.HelpIntent" }, { "intent": "AMAZON.StopIntent" }, { "intent": "AMAZON.CancelIntent" } ] }

    Skærmbillede 2017-06-10 kl. 16.48.49.png 
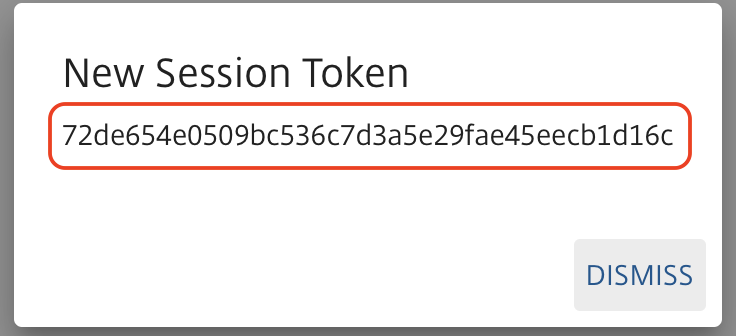
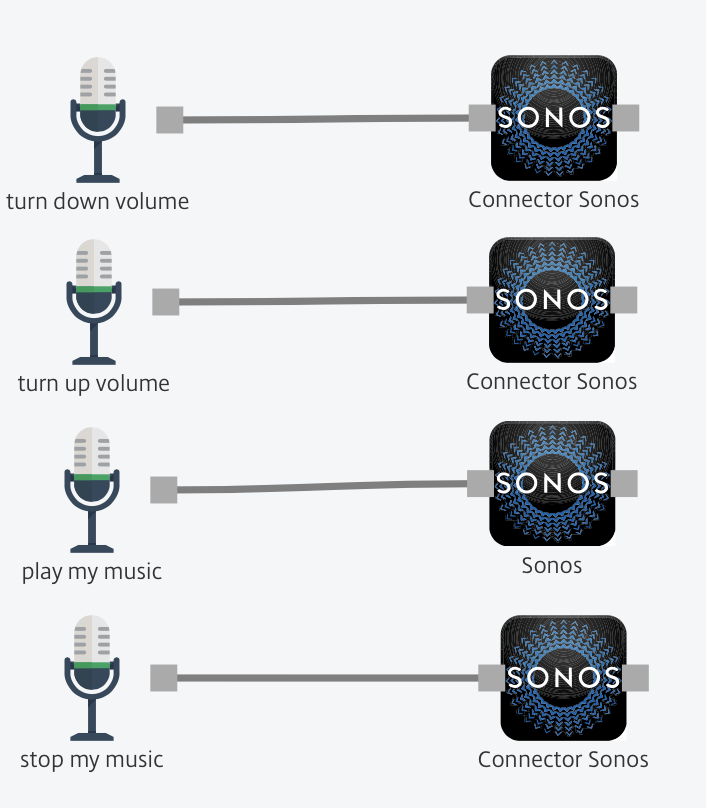
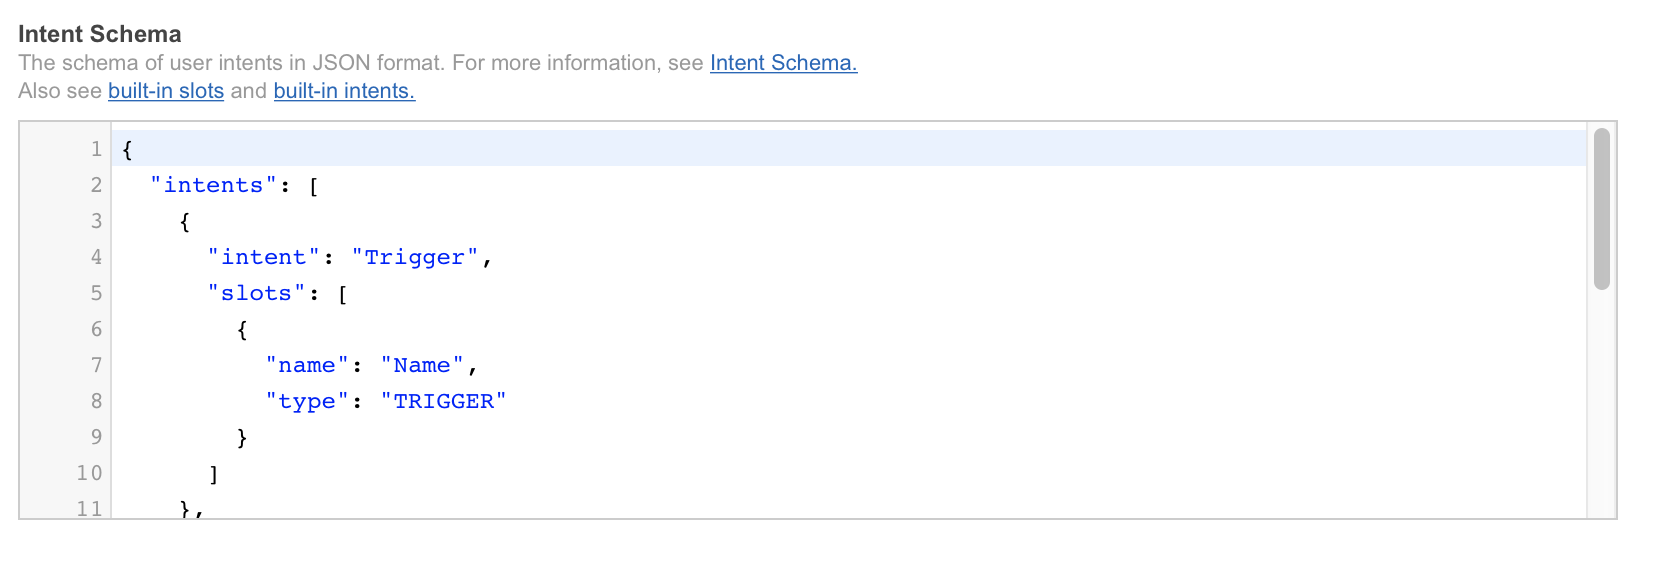
8. In the “Custom slot types” type in “TRIGGER” under “Enter Type”. “Enter Values” will be the commands Alexa and Octoblu needs to handle, in my case “play my music” and “stop my music”. When used with Alexa this will translate into “Alexa ask octoblu play my music”. Skærmbillede 2017-06-11 kl. 14.56.53.png 
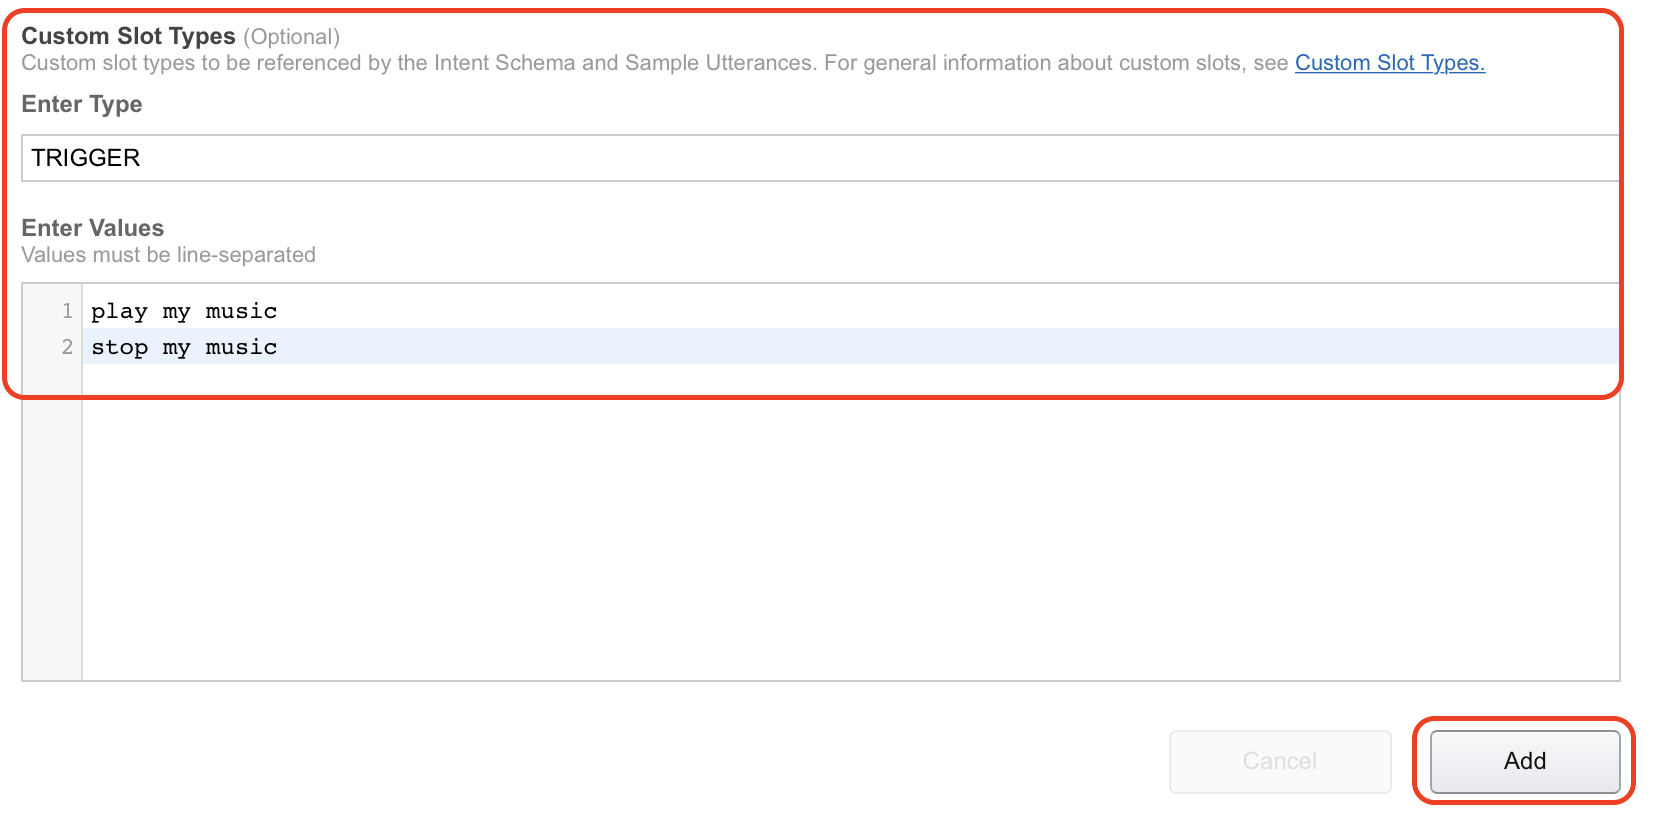
9. Under “Sample utterances” I have filled in the information from the guide as well. I have pasted both code and picture in below to illustrate. Trigger give me the {Name} Trigger give me {Name} Trigger give me a {Name} Trigger get me the {Name} Trigger get me {Name} Trigger get me a {Name} Trigger could you set {Name} Trigger could you please set {Name} Trigger i need {Name} Trigger i need {Name} please Trigger tell me my {Name} Trigger list {Name} Trigger i want {Name} Trigger create {Name} Trigger create a {Name} ListTriggers what my triggers are ListTriggers give me a list of my triggers ListTriggers get me a list of my triggers ListTriggers a list of my triggers ListTriggers my triggers ListTriggers the triggers i have ListTriggers what triggers do i have

    Skærmbillede 2017-06-11 kl. 15.56.47.png 10. Click on “Next” to continue with the setup.Skærmbillede 2017-06-11 kl. 16.02.18.png 
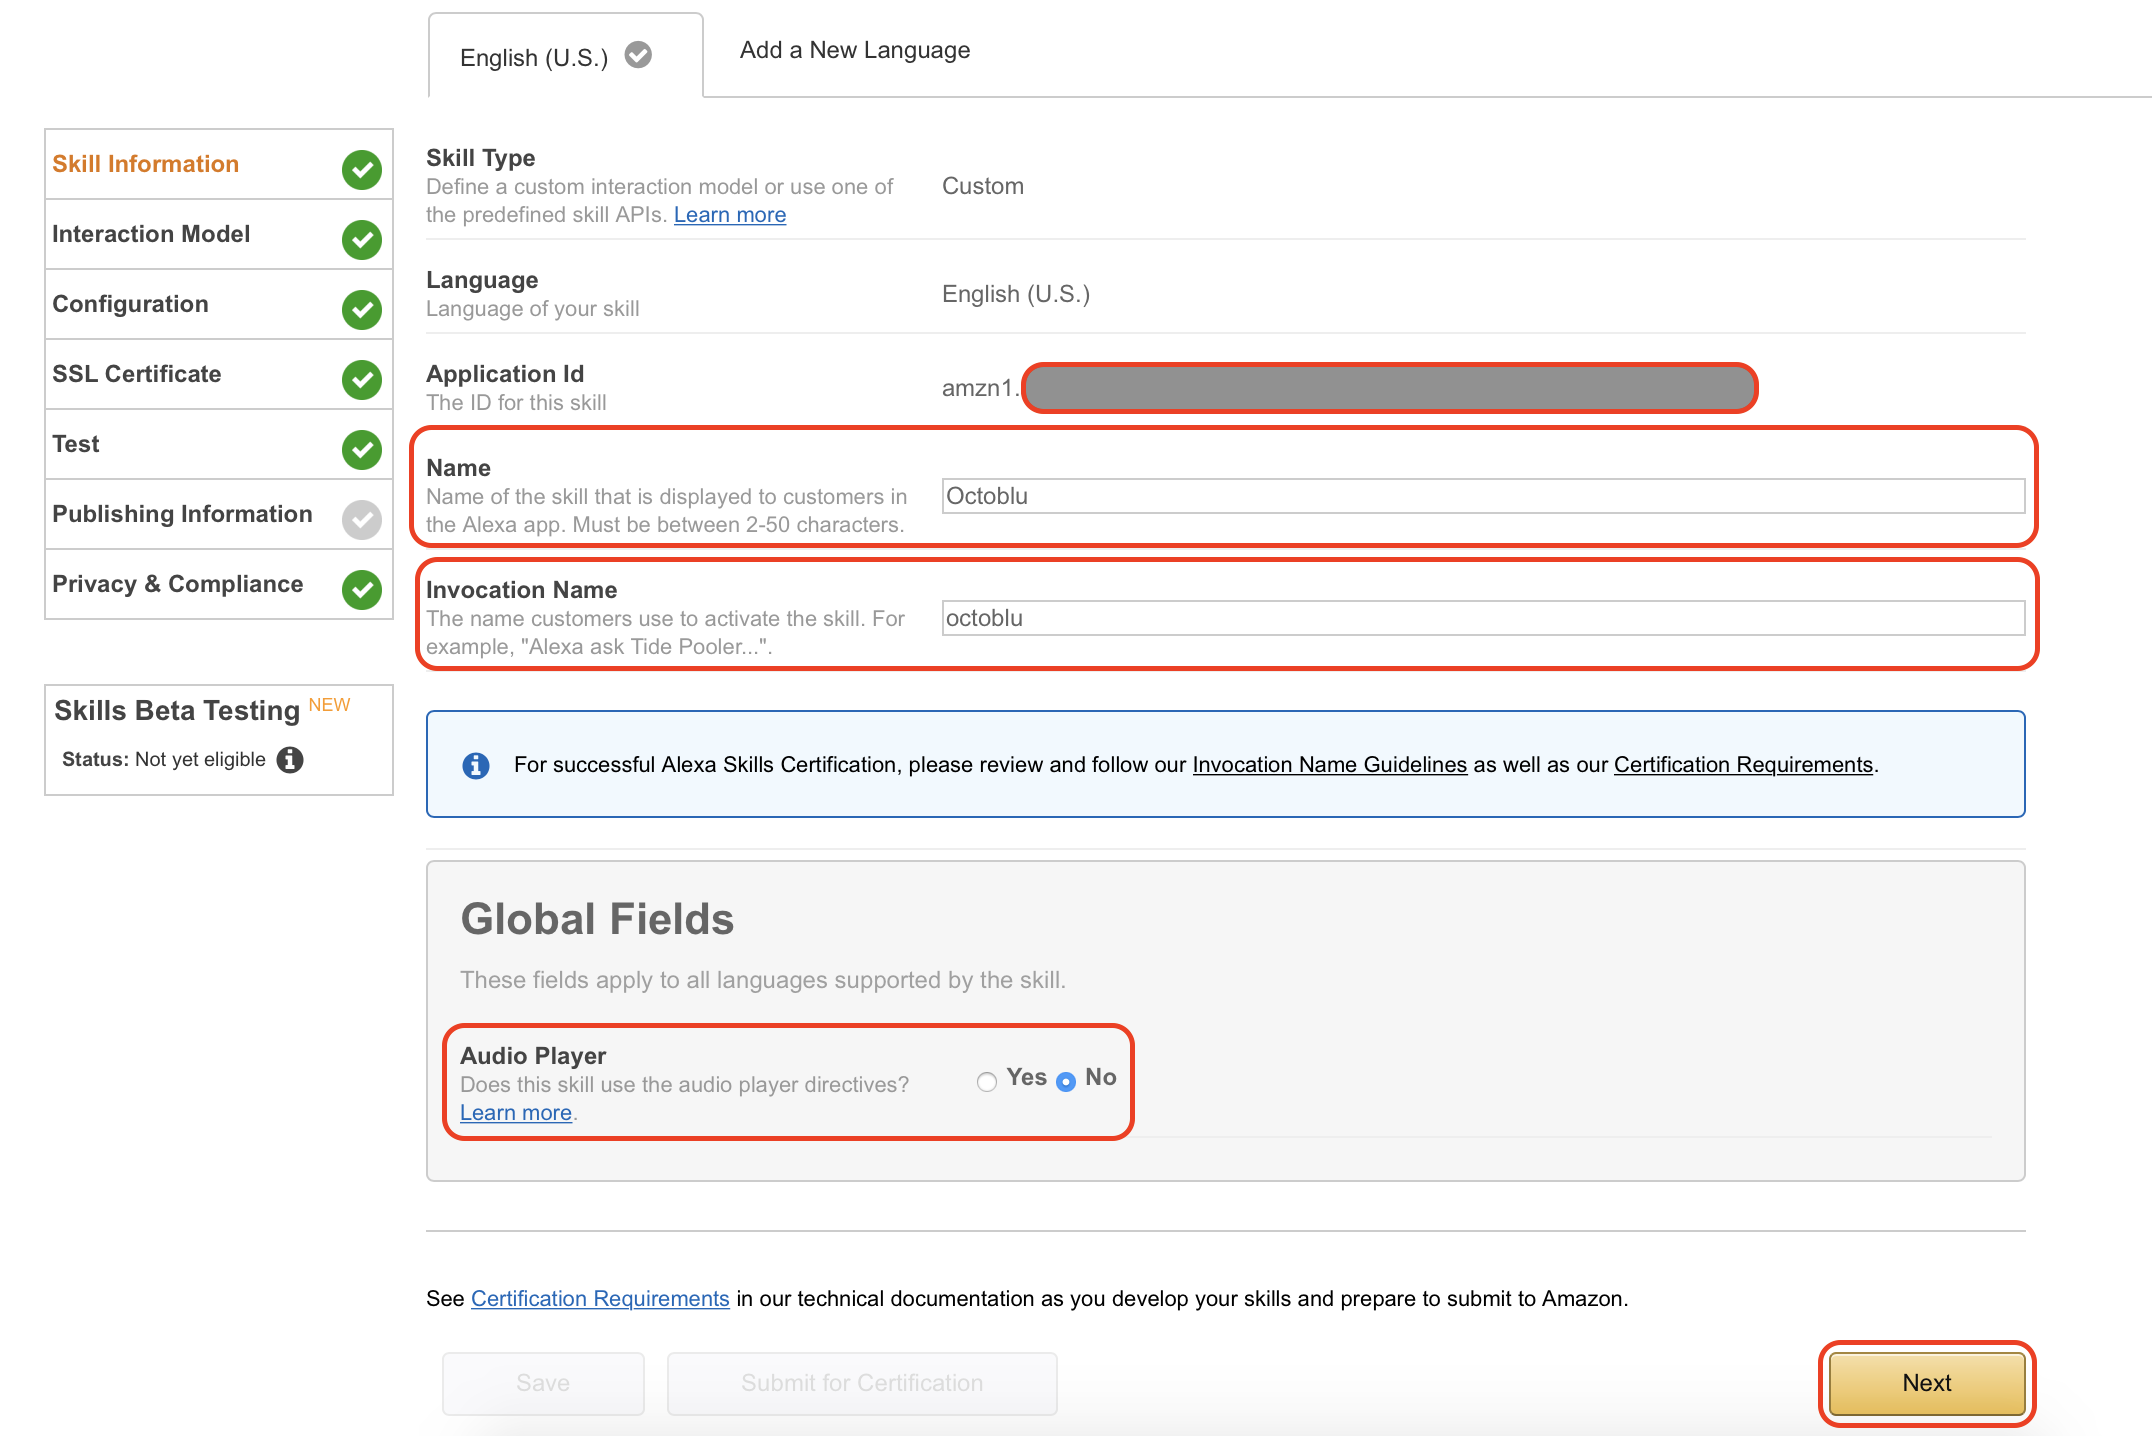
11. Under “Global Fields” mark “HTTPS” as “Service Endpoint Type” and mark the geographical location near you. I have selected “North America” this time, but will try and change that since I am based in Denmark. Also make sure that you have “Account linking” enabled by marking “Yes” in that section. Skærmbillede 2017-06-11 kl. 16.03.22.png 
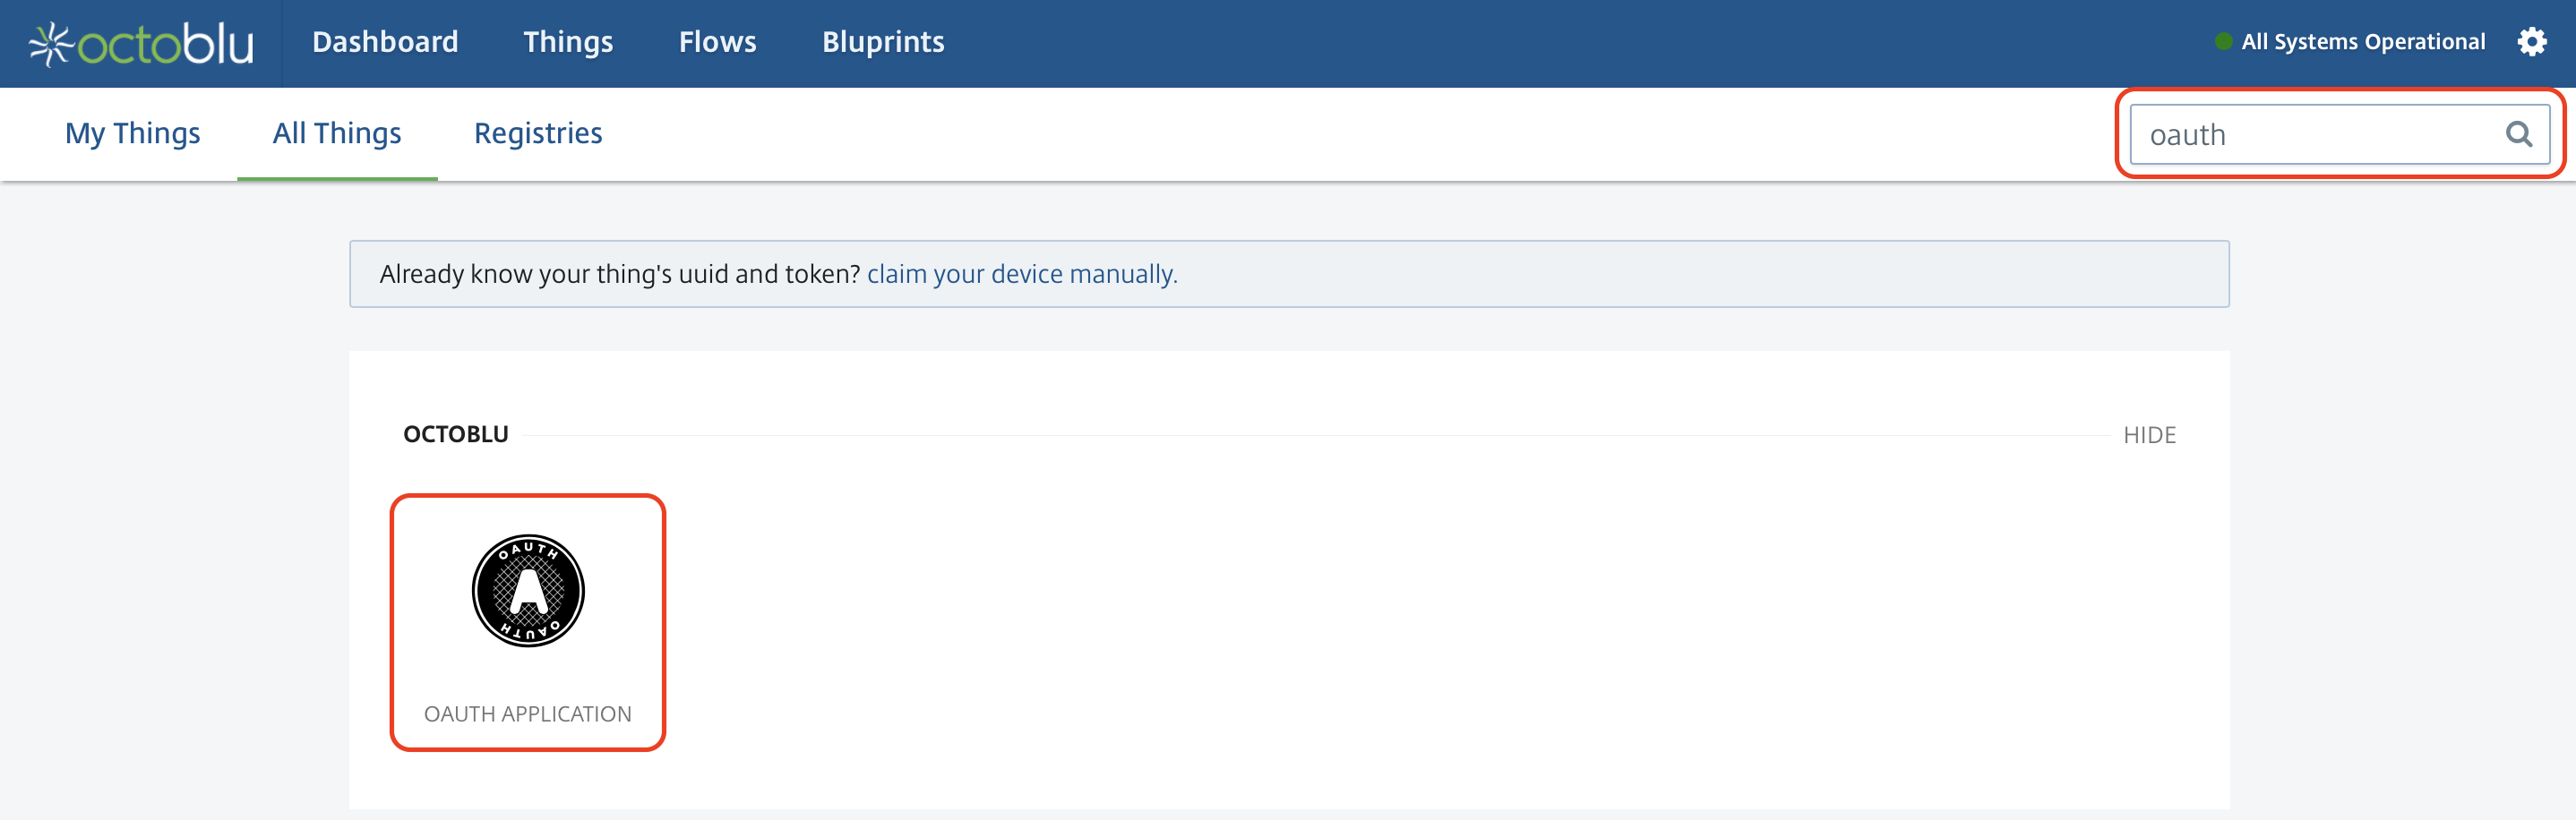
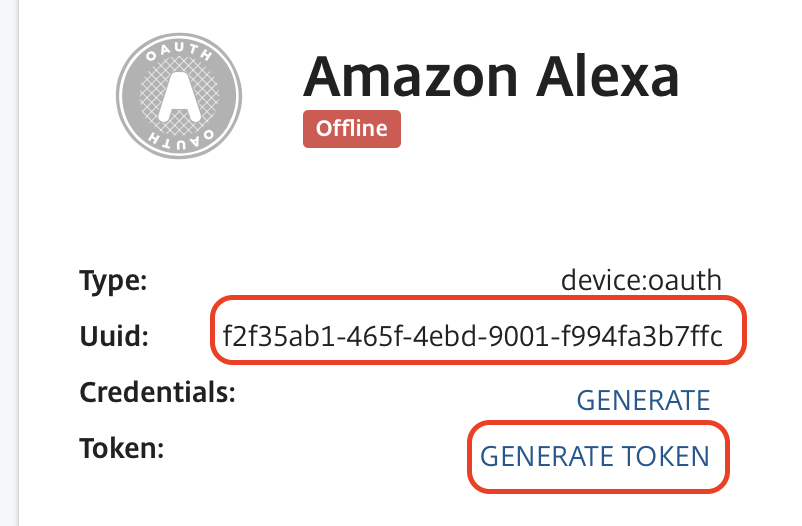
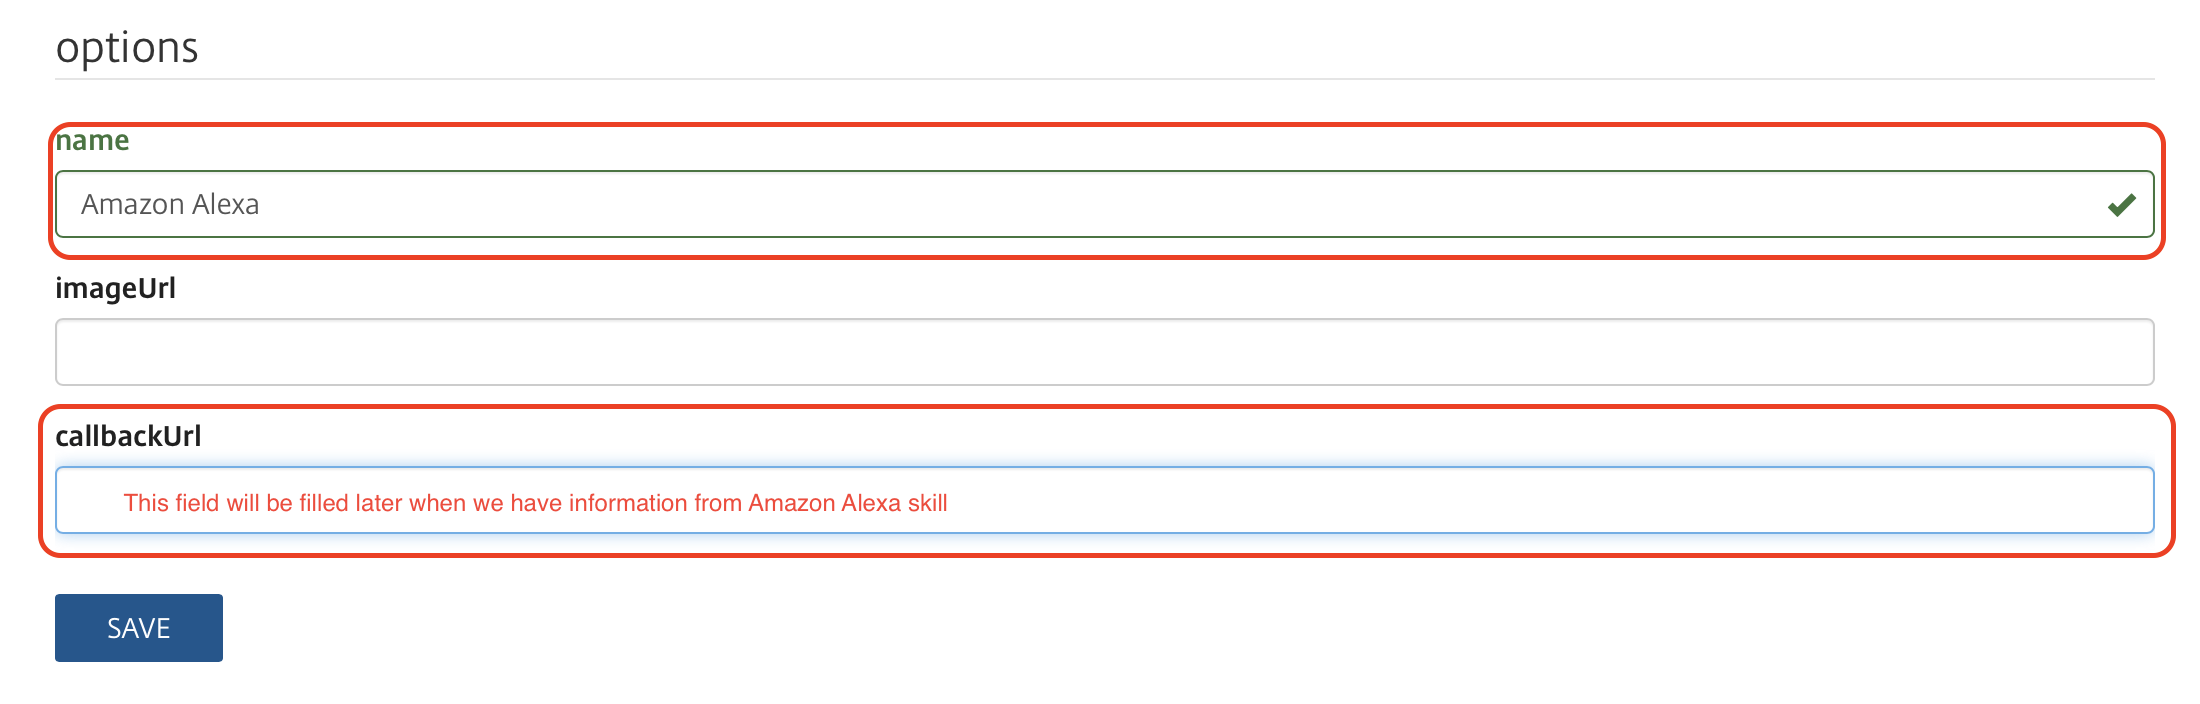
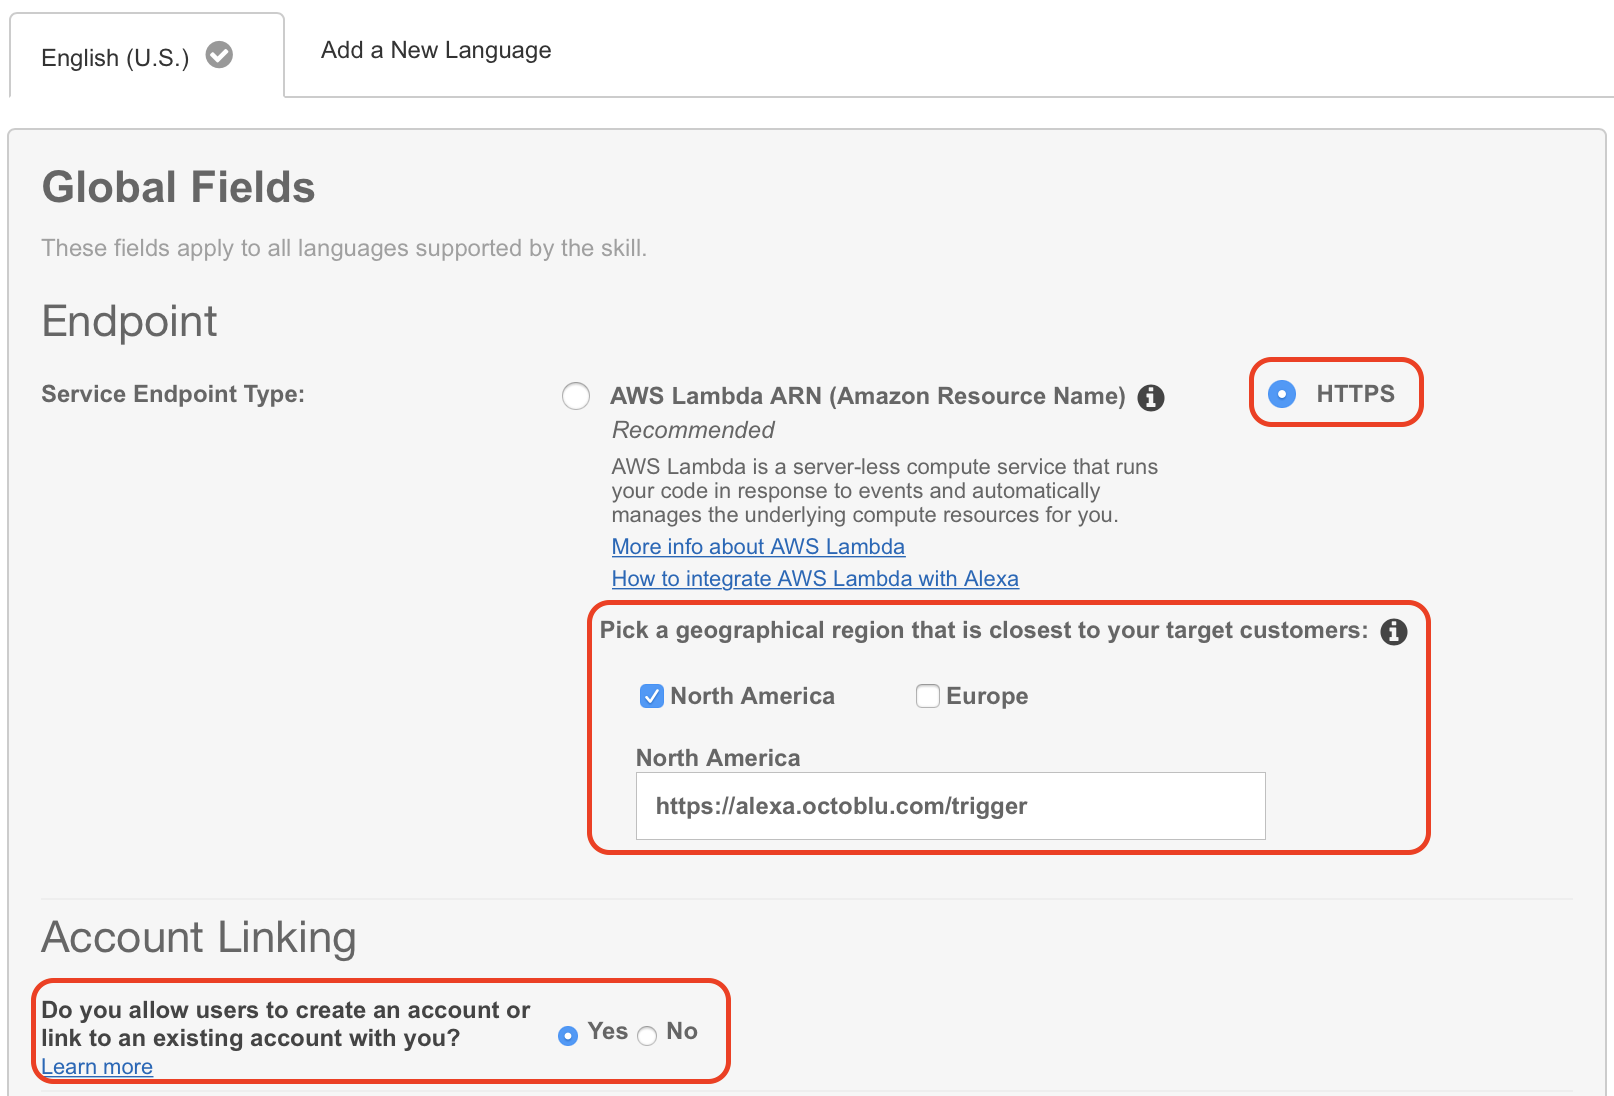
12. You will need to fill in some fields on this next screen. “Authorization URL” is “https://oauth.octoblu.com/alexa/authorize”. The client ID is the UUID from the app that we created in the Octoblu part of this guide. The domain list is a list of domains where you can fetch information from. I have used the list from the guide I found on GitHub. There is no need to set a scope for this setup. Skærmbillede 2017-06-11 kl. 16.07.35.png 
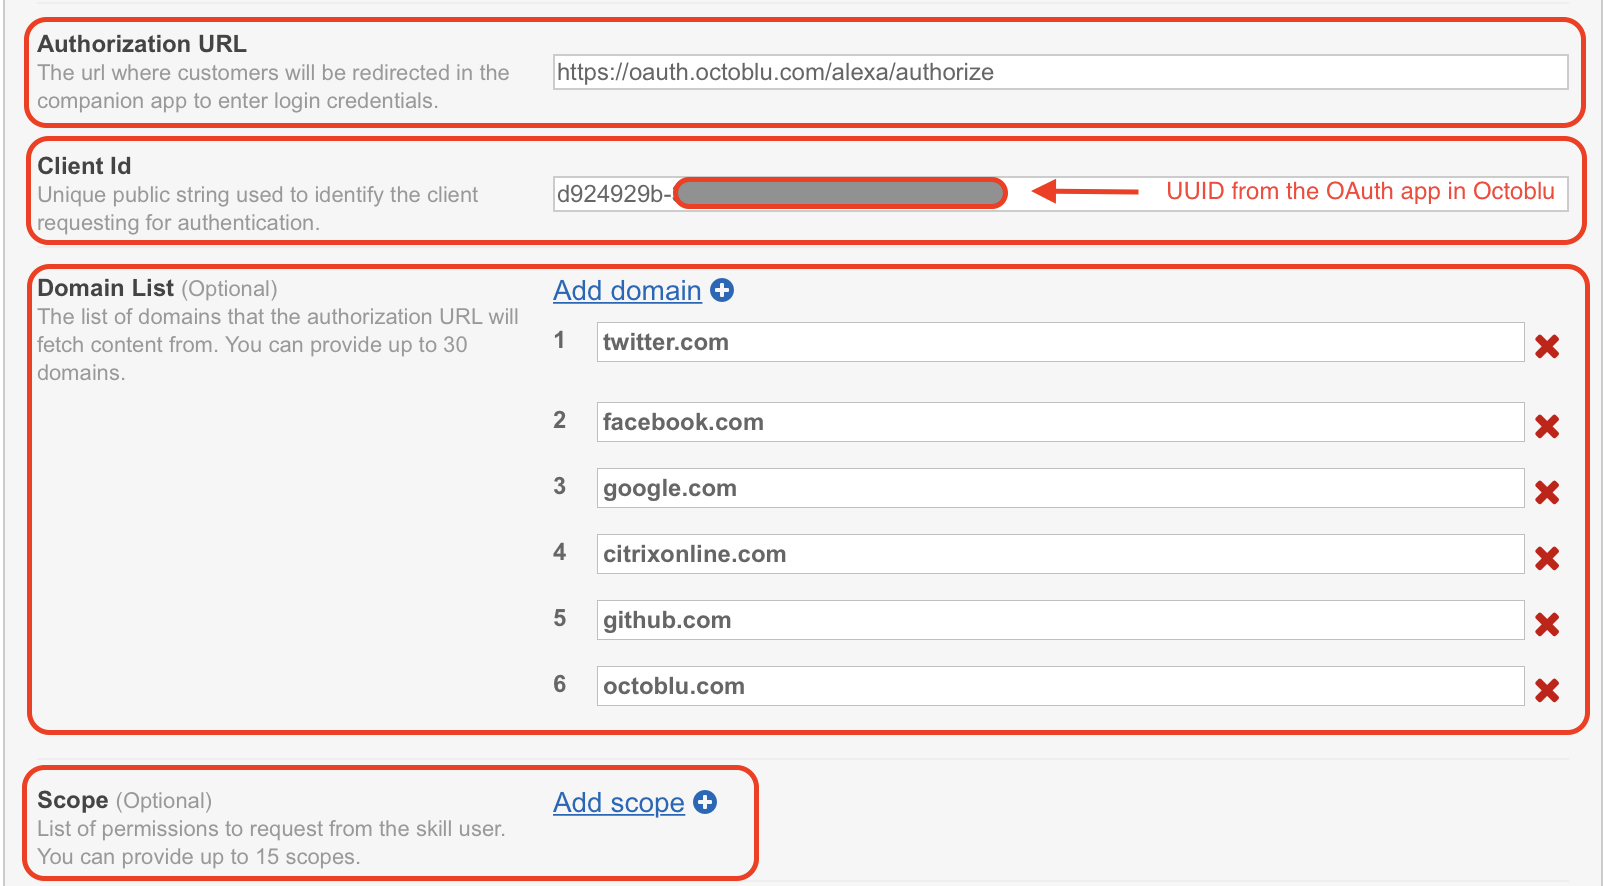
13. The redirect URLs are the ones you need to put back into the Octoblu app, so note them down. Set “Authorization grant type” to “Auth Code Grant”, set “Access Token URI” to “https://oauth.octoblu.com/access_token” and the “Client Secret” is the token that we generated in the Octoblu app. Set the “Client Authentication Scheme” to “HTTP Basic (Recommended)” and under permission I have put in “List Read” and “List Write” I don’t think they are needed, but this is how my working setup is created. The “Privacy Policy URL” I have set to “https://app.octoblu.com/terms”. Click on “Next” when ready. Skærmbillede 2017-06-11 kl. 16.17.59 
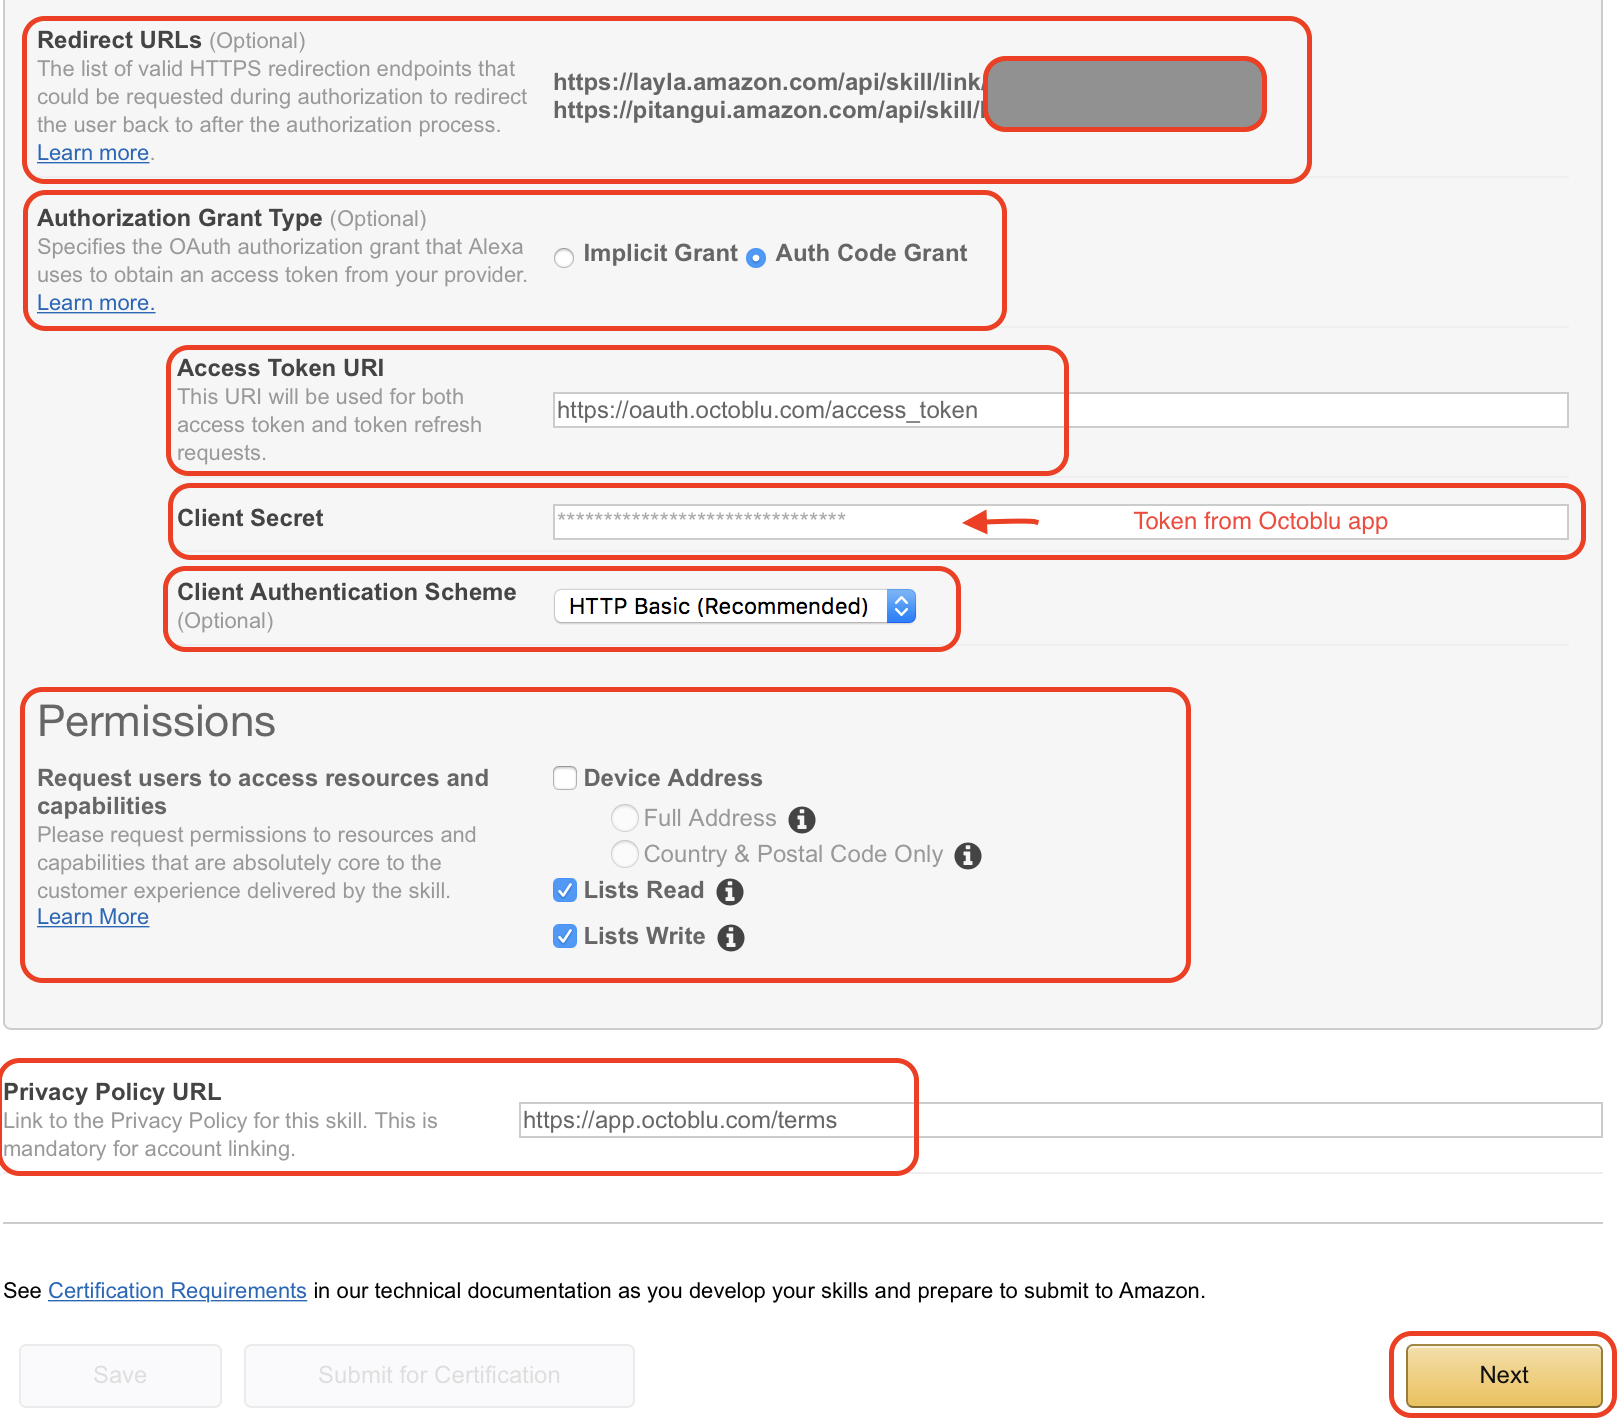
14. For the SSL certificate setup mark the “My development endpoint has a certificate from a trusted certificate authority” and click “Next”Skærmbillede 2017-06-11 kl. 16.28.34 
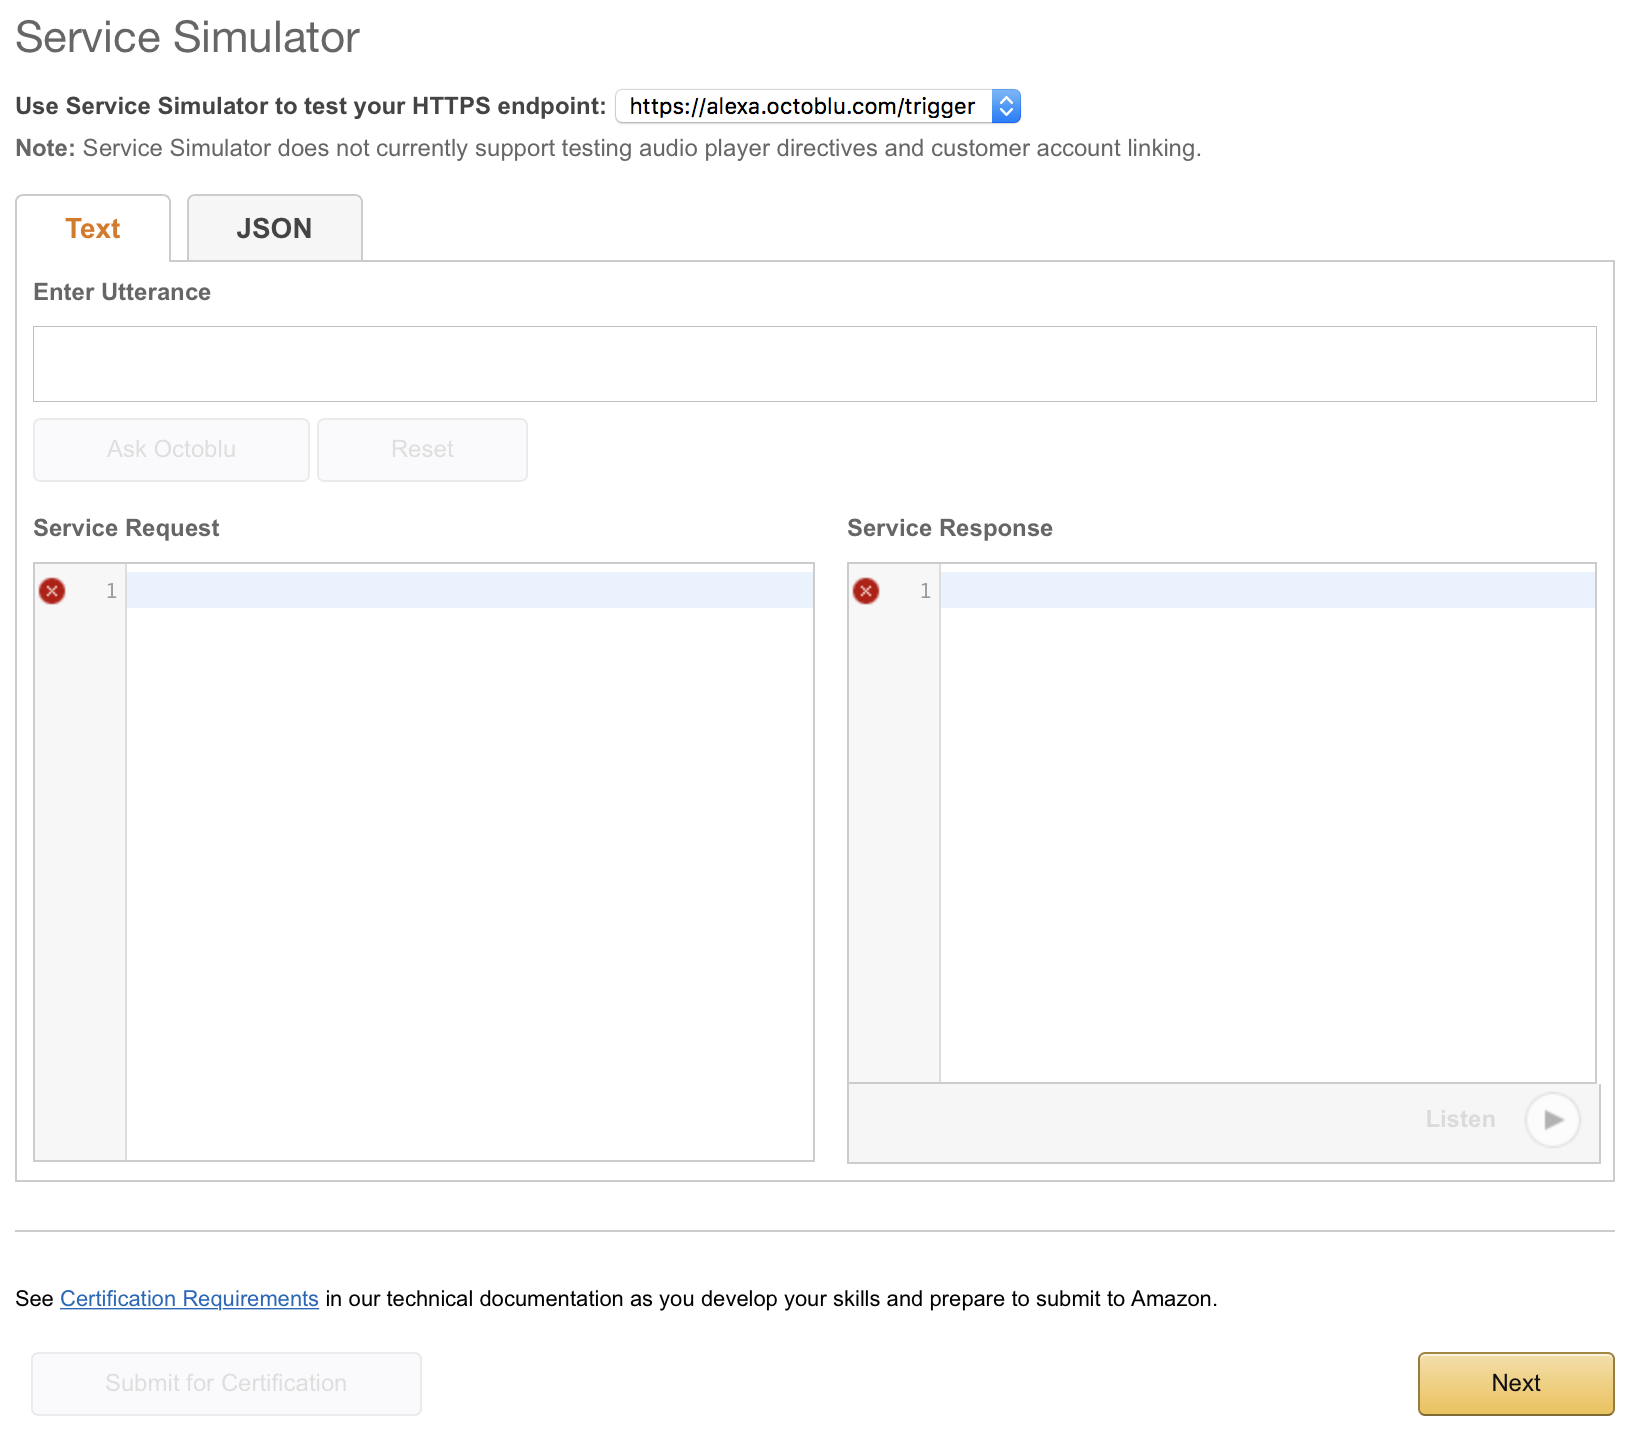
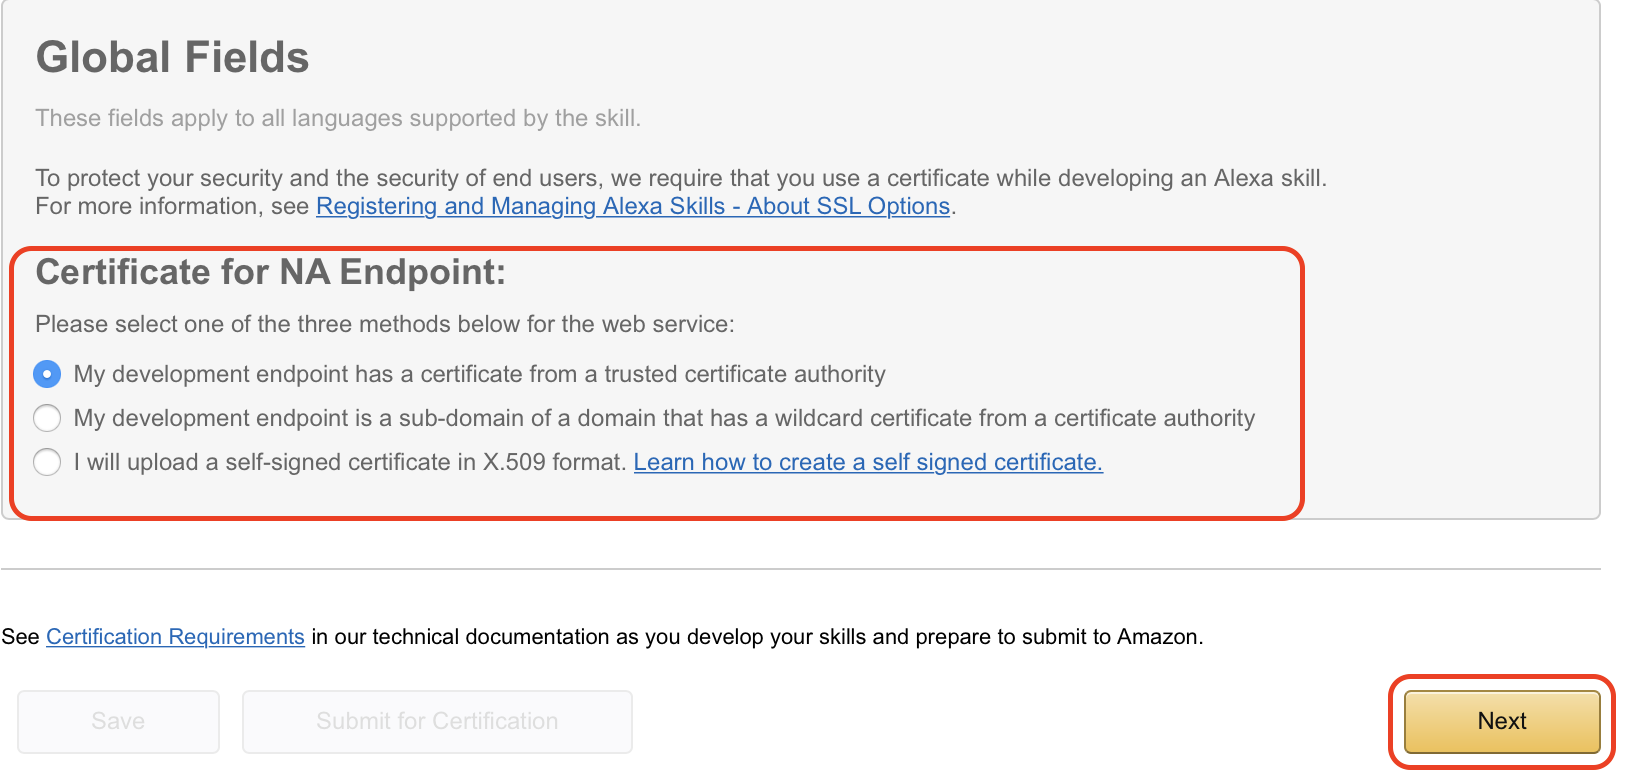
15. The next page isn’t used in my case, but just so you can follow along this is what it looks like. Click on “Next” to continue.Skærmbillede 2017-06-11 kl. 16.32.54Skærmbillede 2017-06-11 kl. 16.33.07 
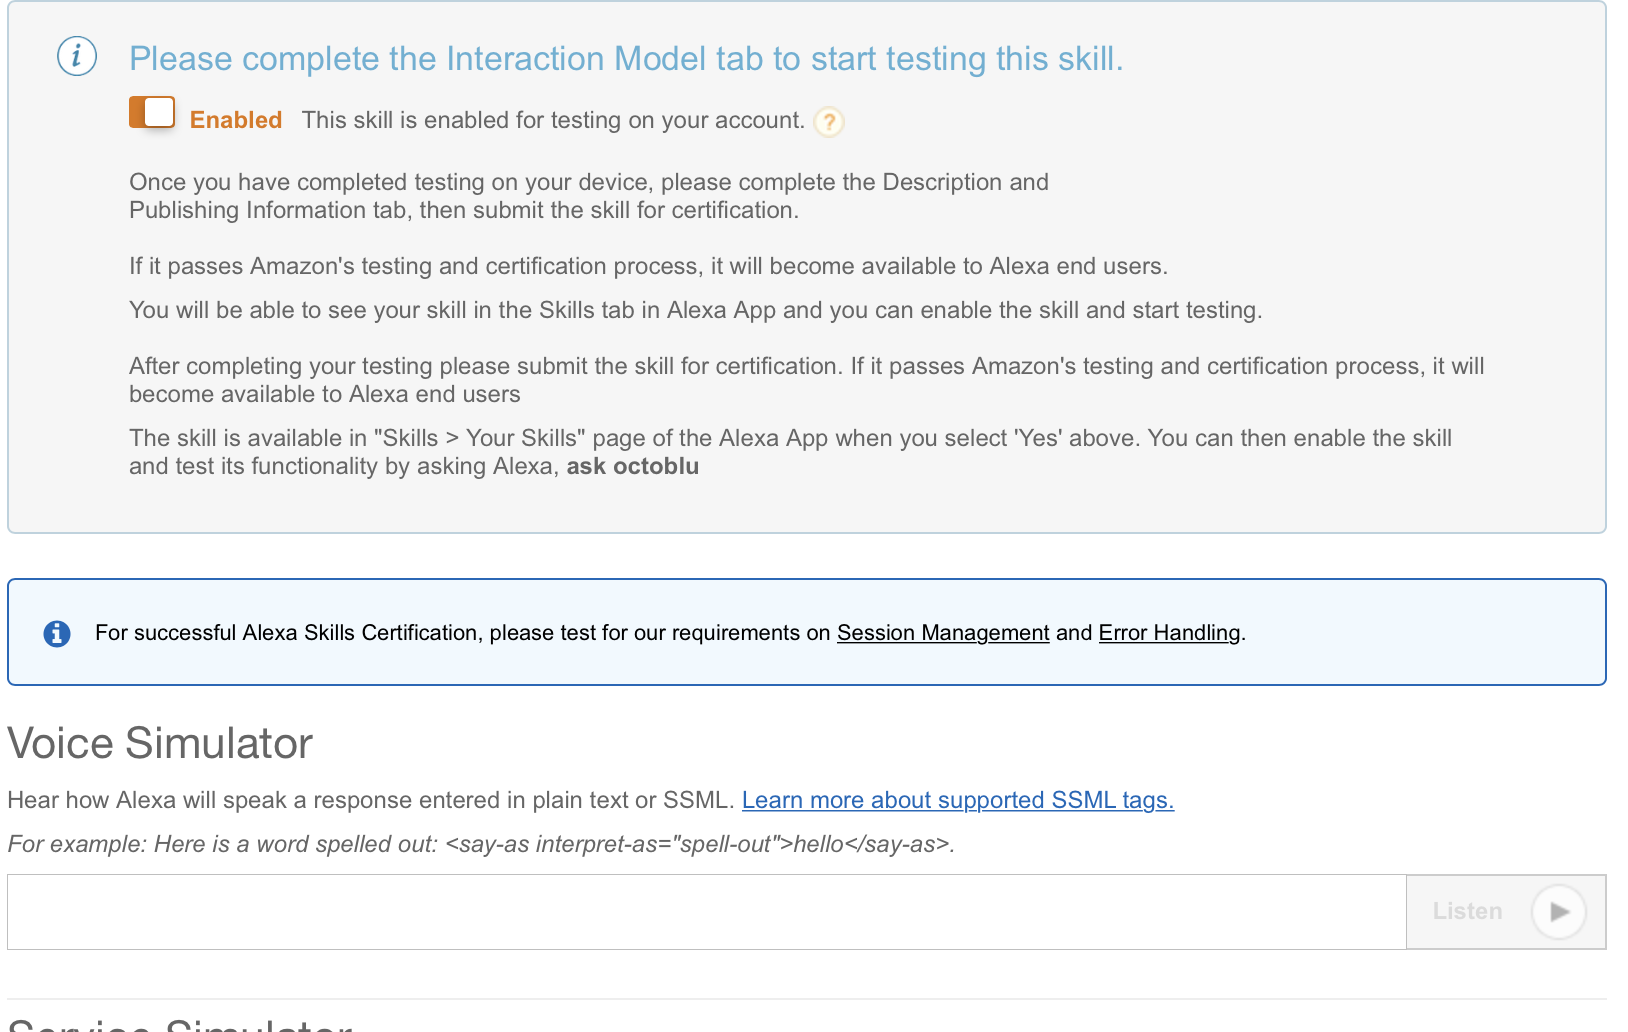
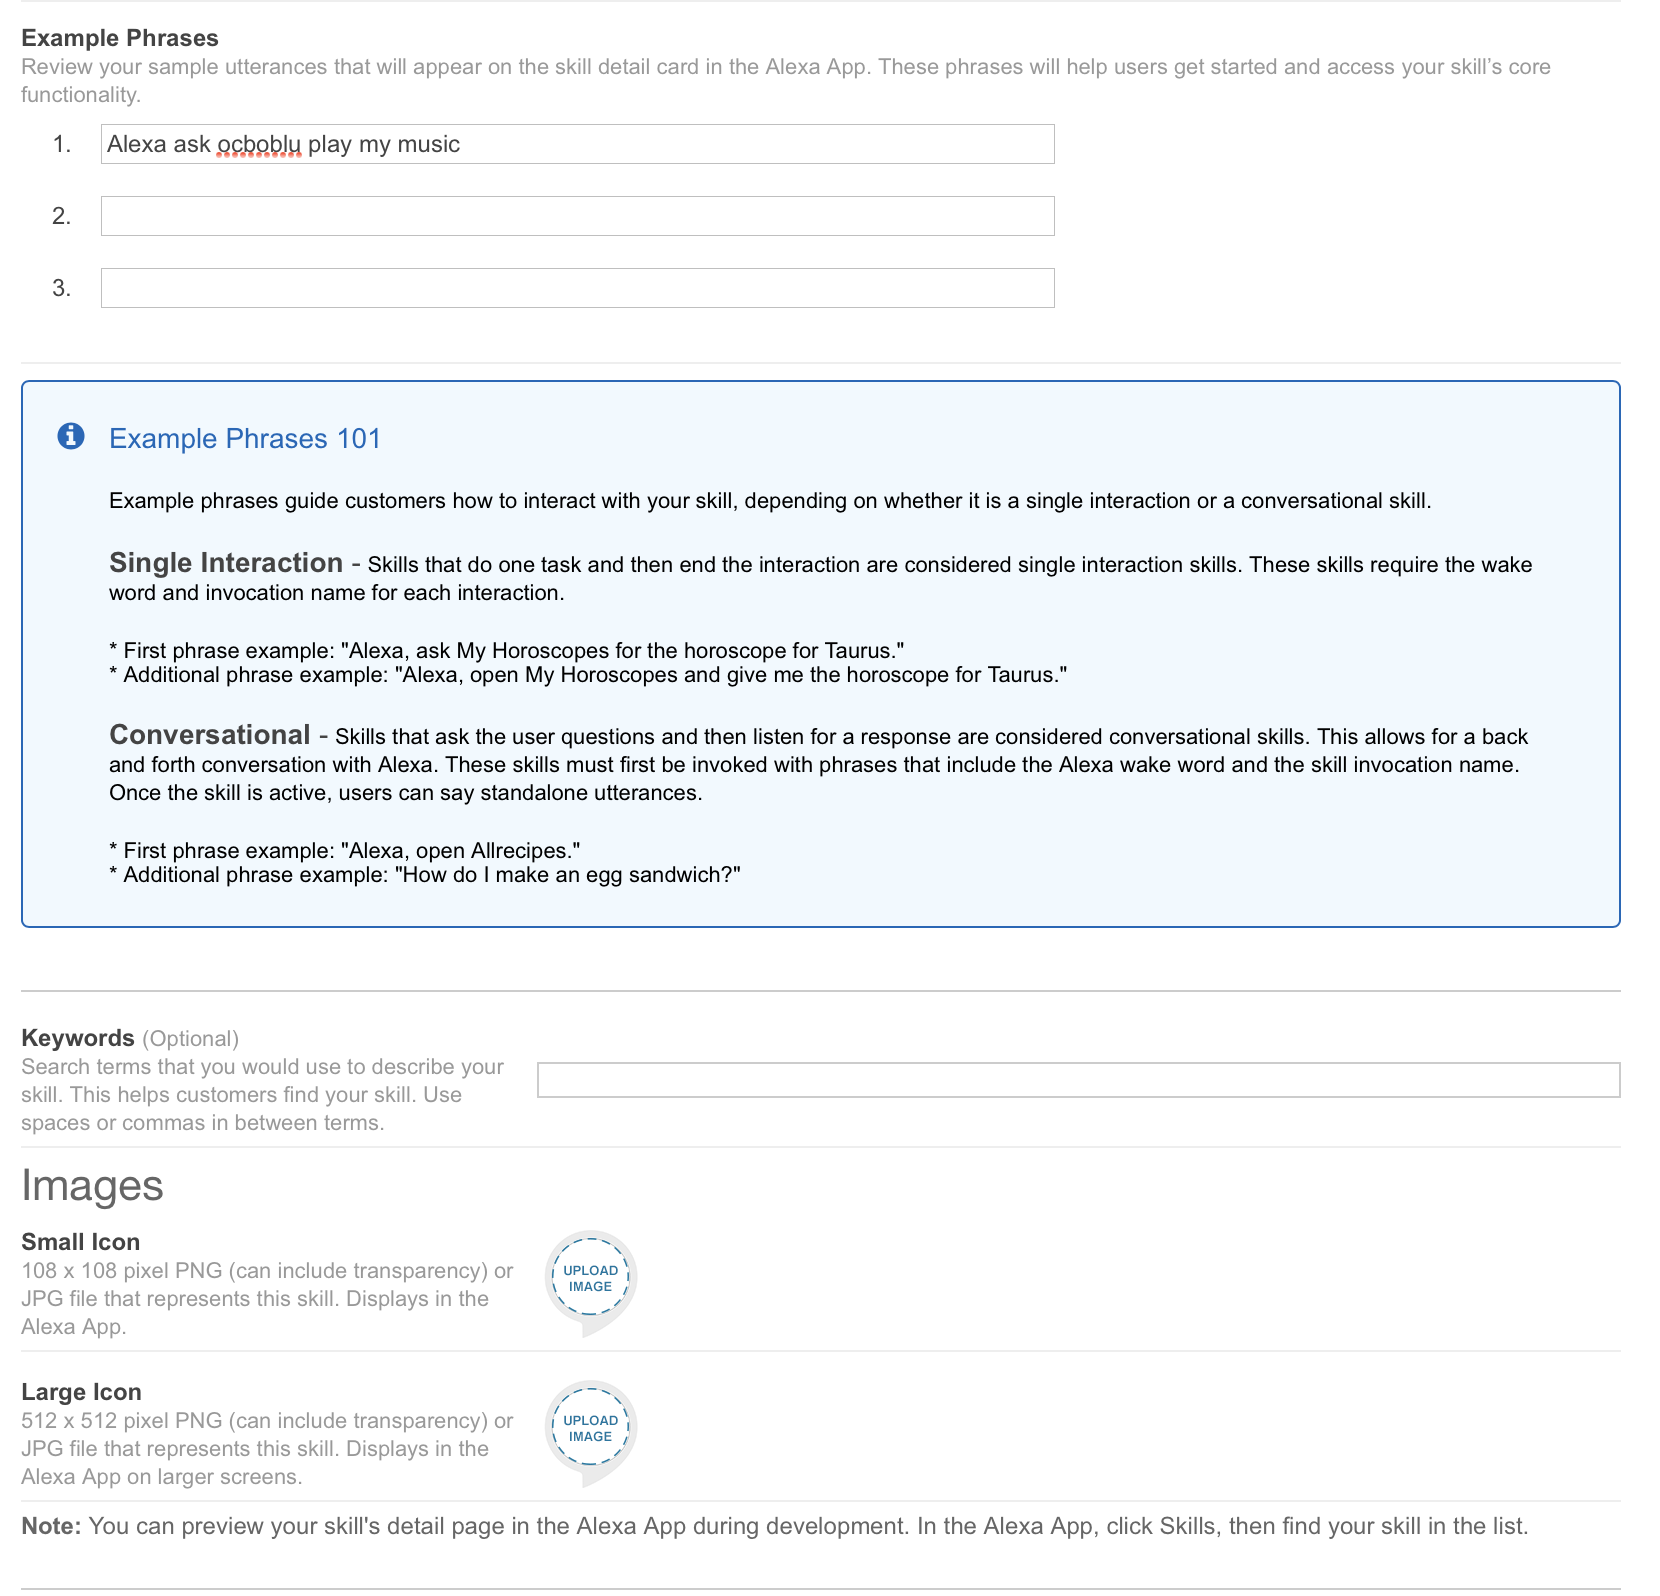
16. The publishing section isn’t used in my case either. I did put a bit of information in there and I have posted screenshots below so you can follow along. Click on “Next” to continue.Skærmbillede 2017-06-11 kl. 16.35.06Skærmbillede 2017-06-11 kl. 16.35.31Skærmbillede 2017-06-11 kl. 16.35.38 
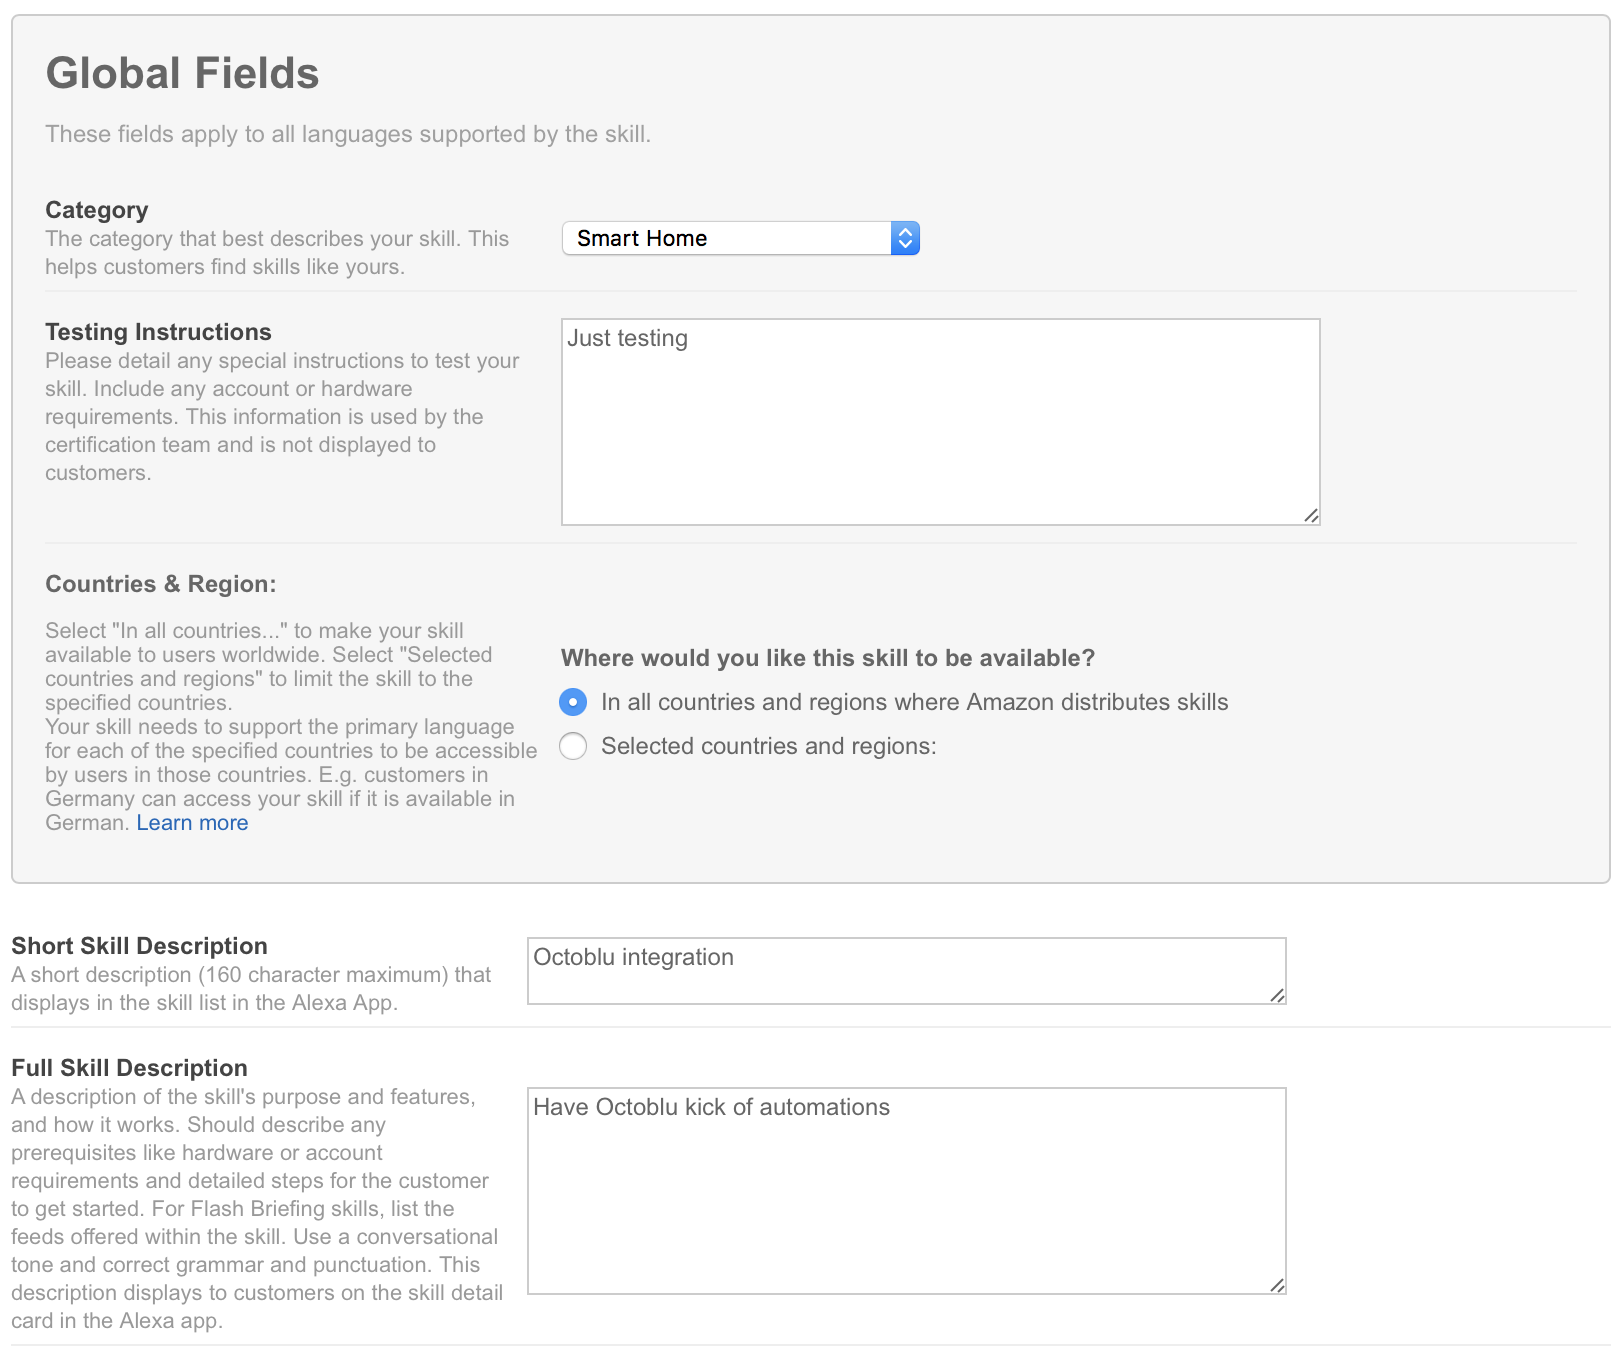
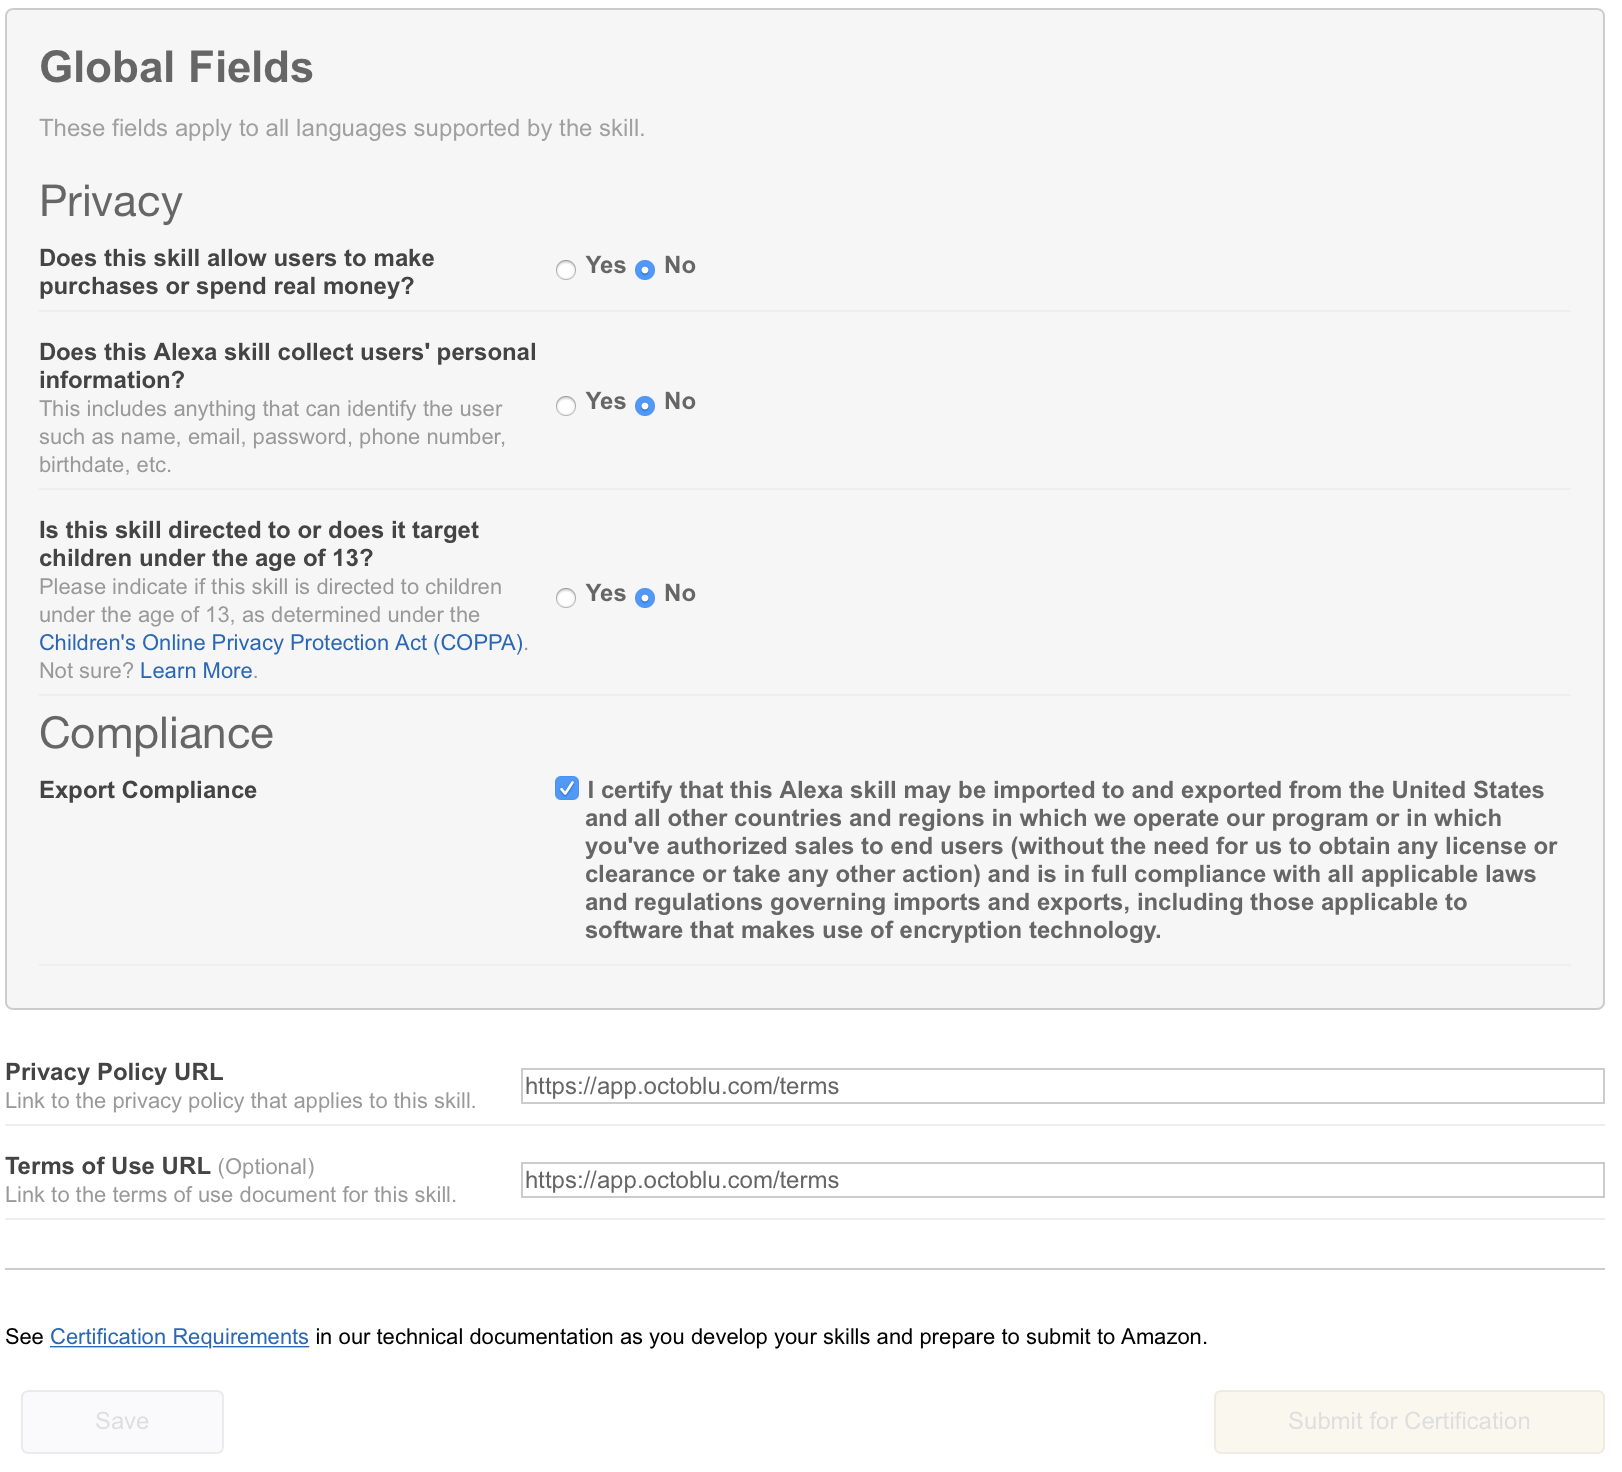
17. On the last tab, we have privacy settings. I have filled them out, but since I am not publishing this skill it really isn’t needed. Click on “Save” to complete the setup. Skærmbillede 2017-06-11 kl. 16.37.43

Going back to Octoblu to fill in the missing part from the setup.

We had one thing we needed from the Alexa setup over in the Oauth application in Octoblu, so let’s get those information in.

  1. Go to https://app.octoblu.com/ and sign up for an account if you don’t have one already
  2. Click on “Things” Skærmbillede 2017-06-11 kl. 14.04.18
  3. Scroll down to you find your Oauth application and click on it.Skærmbillede 2017-06-11 kl. 14.06.09
  4. Fill in the “Callback URL” and click on “Save”. The callback url is the “Redirect URLs” from the Alexa configuration.Skærmbillede 2017-06-11 kl. 16.42.23.png

The last configuration part – Linking Alexa and Octoblu accounts.

The last part we need to do before we can start using Alexa to kick off Octoblu flows is to link the two configurations together. This is done in the Alexa configuration as shown below.

  1. Go to http://alexa.amazon.com/
  2. Click on “Skills” in the left side of the screen and when that is loaded click on “Your Skills” in the top right of the screen.Skærmbillede 2017-06-11 kl. 16.46.53.png
  3. Find your Octoblu skill in the list, yours should say “Account linking required”Skærmbillede 2017-06-11 kl. 16.48.39
  4. Click on “Link Account”.Skærmbillede 2017-06-11 kl. 16.52.52
  5. This will redirect you to the Octoblu site where you click on “Authorize”. I forgot to take that last screenshot, but hope you can manage without it.

An Octoblu example

To show just a simple example on how to use the setup in Octoblu look at the screenshot below. I have four “Echo in” controls that each links to an action on my Sonos speaker. Skærmbillede 2017-06-11 kl. 16.56.01

Hope this guide can help you get started with using Alexa and Citrix Octoblu to do some amazing workflows for both work and home automation.

Generating wildcard certificate from internal certificate authority using PowerShell

DISCLAIMER: THIS IS NOT INTENDED FOR ANY PRODUCTION ENVIRONMENT

Updated on June 24th 2017: Correction to issue where the server it was running on already has a server authentication certificate. Thank you Eric (@XenAppBlog) for the feedback.

Updated on June 25th 2017: Updated with a new version of the script that requires Windows 10 or Server 2016. The updated version adds support for password protection of the PFX file and it also cleans up private keys after export.

Hi all,

When you are building Citrix environments or any other environment that uses certificates it is often easiest to use a wildcard certificate from your internal PKI infrastructure when you are testing. I had a talk with Dave Brett at Synergy about automating the process of getting a wildcard PFX certificate that can be used during automation of Citrix installations. I thought it would be an easy task since Microsoft has baking in PowerShell in most of their products and services now, but it turned out that I couldn’t find any native PowerShell commands that allowed be to perform the task.

Since I like doing PowerShell scripts an automation that of course wasn’t the end of it, so I started digging into what can be done and I found this script on the Microsoft Script Center: MS Script Center The problem I had with this script is that I wouldn’t do wildcard certificates.

After a while I started to build my own script from scratch, but of course getting a lot of inspiration from the script found on MS Script center. I build the script out so that I would locate the CA inside the domain by itself (only tested when there is one CA in the environment) and the doing an export to a file server as well.

The script needs to be run as a domain user, so that cause a lot of testing when incorporating it with Microsoft MDT, but got that working in the end.

To use the script in MDT follow these steps:

  1. Add a “Run Command Line” action to the task sequence Skærmbillede 2017-06-07 kl. 20.49.56.png
  2. Mark “Run this step as the following account” and enter a domain user name and password as shown below Skærmbillede 2017-06-07 kl. 20.50.17.png
  3. Place the scripts in the scripts folder (or any other place you feel like and can reference) Skærmbillede 2017-06-07 kl. 20.50.46.png
  4. Edit the “New-WildcardCertificate.cmd” file to map the network drive of your choice and execute the PowerShell script. If you follow my guide it will map to your MDT deployment share. Skærmbillede 2017-06-07 kl. 20.51.26.png
  5. Run the task sequence and test it out.

The PowerShell script is shown in the bottom of this post and as always let me know if you have input or questions about it.

You can download the two scripts and ini file here: Download

/Martin

<#
.Synopsis
   Automate the creation of wildcard certificates
.DESCRIPTION
   This script can automate the creation of wildcard certificates from an internal PKI infrastructure.
   The output PFX file will not have a password and it will be placed in the folder the PS1 script is located.
   You will need to have the SSL.INI file in the same folder as this script and you will need to run the script as a domain users.
   Use the function within this script by editing the line in the buttom.
.PARAMETER Path
  Path to where temporary files are stored
.PARAMETER PFXPath
  Path to where the PFX file is exported
.PARAMETER CAName
  Name of the Certificate authority    
.EXAMPLE
   New-WildcardCertificate
.EXAMPLE
   New-WildcardCertificate -Path C:\Temp -PFXPath "\\FILE01\Certificates" 
.EXAMPLE
   New-WildcardCertificate -Path C:\Temp -PFXPath "\\FILE01\Certificates" -CAName "DC01.Domain.Com\Domain-DC01-CA"
#>
Function New-WildcardCertificate {
    [CmdletBinding()]
    Param(
      [Parameter(Mandatory=$False,Position=1)]
       [string]$Path = "C:\Windows\Temp",
       [Parameter(Mandatory=$False,Position=2)]
       [string]$PFXPath = ".",
       [Parameter(Mandatory=$False,Position=3)]
       [string]$CAName
    )
    Begin {
        $Domain = (Get-ItemProperty -path hklm:\SYSTEM\CurrentControlSet\Services\Tcpip\Parameters -Name Domain).Domain
        If (!(Test-Path -Path $PSScriptRoot\ssl.ini)) {
            Write-Host "You don't have the SSL.INI file that is required to run this script" -ForegroundColor Red
            Break;
        }
        If (!(Test-Path -Path $Path)) {
            New-Item -Path $Path -ItemType Directory
        }
        (Get-Content $PSScriptRoot\ssl.ini) | Foreach-Object {$_ -replace 'ServerFQDN',"*.$Domain"}  | Out-File .\Wildcard.ini
    }
    Process {
        If ($CAName -eq "") {
            Write-Verbose "Finding certificate authority"
            $CA = New-Object -ComObject CertificateAuthority.Config
            $CAName = $CA.GetConfig(0)
        }

        Write-Verbose "Requesting certificate" 
        & c:\windows\system32\certreq.exe –new "Wildcard.ini" "$Path\wildcard.req"
        & c:\windows\system32\certreq.exe -config "$CAName" –submit "$Path\wildcard.req" "$Path\wildcard.cer"

        Write-Verbose "Installing certificate" 
        & c:\windows\system32\certreq.exe –accept "$Path\wildcard.cer"

        Write-Verbose "Exporting certificate and private key"
        $cert = new-object security.cryptography.x509certificates.x509certificate2 -arg "$Path\wildcard.cer"

        $certbytes = $cert.export([System.Security.Cryptography.X509Certificates.X509ContentType]::pfx)

        $certbytes | Set-Content -Encoding Byte  -Path "$PFXPath\Wildcard.pfx" -ea Stop 
        Write-Verbose "Certificate successfully exportert to wildcard.pfx"
    }   
    End {
        Write-Verbose "deleting exported certificat from computer store"
        Remove-Item -Path cert:\localmachine\my\$($Cert.Thumbprint) -DeleteKey 
        Remove-Item -Path $Path\wildcard.cer -Force
        Remove-Item -Path $Path\wildcard.req -Force
        Remove-Item -Path $Path\wildcard.rsp -Force
    }
}
New-WildcardCertificate -Path C:\Install -PFXPath "\\Server01\Shares" -Verbose

For Windows 10 and 2016 only:

<#
.Synopsis
   Automate the creation of wildcard certificates
.DESCRIPTION
   This script can automate the creation of wildcard certificates from an internal PKI infrastructure.
   The output PFX file will not have a password and it will be placed in the folder the PS1 script is located.
   You will need to have the SSL.INI file in the same folder as this script and you will need to run the script as a domain users.
   Use the function within this script by editing the line in the buttom.
.PARAMETER Path
  Path to where temporary files are stored
.PARAMETER PFXPath
  Path to where the PFX file is exported
.PARAMETER CAName
  Name of the Certificate authority    
.EXAMPLE
   New-WildcardCertificate
.EXAMPLE
   New-WildcardCertificate -Path C:\Temp -PFXPath "\\FILE01\Certificates" 
.EXAMPLE
   New-WildcardCertificate -Path C:\Temp -PFXPath "\\FILE01\Certificates" -CAName "DC01.Domain.Com\Domain-DC01-CA"
#>
Function New-WildcardCertificate {
    [CmdletBinding()]
    Param(
      [Parameter(Mandatory=$False,Position=1)]
       [string]$Path = "C:\Windows\Temp",
       [Parameter(Mandatory=$False,Position=2)]
       [string]$PFXPath = ".",
       [Parameter(Mandatory=$False,Position=3)]
       [string]$CAName,
       [Parameter(Mandatory=$False,Position=4)]
       [string]$Password
    )
    Begin {
        $Domain = (Get-ItemProperty -path hklm:\SYSTEM\CurrentControlSet\Services\Tcpip\Parameters -Name Domain).Domain
        If (!(Test-Path -Path $PSScriptRoot\ssl.ini)) {
            Write-Host "You don't have the SSL.INI file that is required to run this script" -ForegroundColor Red
            Break;
        }
        If (!(Test-Path -Path $Path)) {
            New-Item -Path $Path -ItemType Directory
        }
        (Get-Content $PSScriptRoot\ssl.ini) | Foreach-Object {$_ -replace 'ServerFQDN',"*.$Domain"}  | Out-File .\Wildcard.ini
    }
    Process {
        If ($CAName -eq "") {
            Write-Verbose "Finding certificate authority"
            $CA = New-Object -ComObject CertificateAuthority.Config
            $CAName = $CA.GetConfig(0)            
        }
        Write-Verbose "Requesting certificate" 
        & c:\windows\system32\certreq.exe –new "Wildcard.ini" "$Path\wildcard.req"
        & c:\windows\system32\certreq.exe -config "$CAName" –submit "$Path\wildcard.req" "$Path\wildcard.cer"

        Write-Verbose "Installing certificate" 
        & c:\windows\system32\certreq.exe –accept "$Path\wildcard.cer"

        Write-Verbose "Exporting certificate and private key"
        $PFXPassword = ConvertTo-SecureString -String $Password -Force -AsPlainText
        $cert = new-object security.cryptography.x509certificates.x509certificate2 -arg "$Path\wildcard.cer"
        Get-item cert:\localmachine\my\$($cert.Thumbprint) | Export-PfxCertificate -FilePath "$PFXPath\Wildcard.pfx" -Password $PFXPassword 
        Write-Verbose "Certificate successfully exportert to wildcard.pfx"
    }   
    End {
        Write-Verbose "deleting exported certificat from computer store"
        Remove-Item -Path cert:\localmachine\my\$($Cert.Thumbprint) -DeleteKey 
        Remove-Item -Path $Path\wildcard.cer -Force
        Remove-Item -Path $Path\wildcard.req -Force
        Remove-Item -Path $Path\wildcard.rsp -Force
    }
}
New-WildcardCertificate -Path C:\Install -PFXPath "\\Server01\Shares" -Password "Password1" -Verbose

Updating Group policy on specific Delivery Groups and Servers

Doing a lot of Citrix implementations I often find myself wanting to update Group policy on a number of Citrix servers to test changes.

One could log on to every single server and update group policy with the GPupdate command – but hey that would take forever.

Powershell to the rescue.

I created a function that queries for delivery groups and presents them with Out-GridView. Out-GridView is a native cmdlet in powershell that creates a sort of GUI for the object passed into it.

This looks like this in my test environment with two delivery groups present:

When the delivery group you want to update and press the OK button.

This passes the delivery group names on to the next step – selecting the servers to update:

If you want to select all servers press CTRL-A and press OK when ready

The servers choosen is then passed on to the part that dows the actual gpupdate part.

The script utillizes Powershell remoting to issue the GPupdate command to each server choosen

To speed things up in a larger environment the script does this with a powershell job for each server. These jobs run synchronously in batches of 32 by default. This number can be change with the ‘ThrottleLimit’ parameter for Invoke-Command.

Each job fires up a new Powershell instance on your computer so be carefull not to bloat with to many at a time.

If you want to view the progress an result you can use the Get-Job cmdlet:

And when it is has completed:

If a server fails to execute the command it is possible to view the actual output from the remote server for a single job with ‘Retrieve-Job’

As you can see this the exact output as if you had run it locally on your own server.

As this uses Powershell remoting to do its job this has to be enabled. It is enabled by default in Windows Server 2012 and later.

I hope that others will find this usefull and please reach out if you have comments or things that could need improvement.

/Brian

Here is the entire Powershell function:

Function Update-DeliveryGroupGPO {
  <# 
  .Synopsis 
   Refreshes GPO on selected Delivery Groups and servers 
  .DESCRIPTION 
   Queries for list of delivery groups. Based on selected delivery groups servers are retreived. Selected servers will be contacted via Powershell remoting to run a GPupdate 
   command. Use Get-Job to see the execution status of each server selected Use Receive-Job to see the output generated from the job 
  .EXAMPLE 
   Update-DeliveryGroupGPO Starts the script - Uses Out-Gridview to guide through the process 
  .INPUTS 
   Script takes no input from pipeline 
  .OUTPUTS 
   Outputs jobs you can see with Get-Job and Receive-Job
  #>
  [CmdletBinding()]
  Param ()
  Add-PSSnapin citrix*

  $DeliveryGroups = Get-BrokerDesktopGroup |
                      Select-Object Name |
                      Out-GridView -Title "Choose delivery group" -PassThru

  $Servers = Get-BrokerDesktop |
               Where-Object { $DeliveryGroups.name -contains $_.DesktopGroupName } |
               Select-Object DNSName, DesktopGroupName |
               Sort-Object -Property desktopgroupname |
               Out-GridView -Title "Choose servers" -PassThru

  foreach ($Server in $Servers) {
    Write-Host "Updating $($Server.DNSName)"
    Invoke-Command -ComputerName $($Server.DNSName) -ScriptBlock { gpupdate } -AsJob | Out-Null
  }
}