Virtual machine deployment tool
Hi all,
So, as I wrote the other day I will do a dedicated post for the deployment tool I showed on the webinar last week. I haven’t really found a good name for it yet, so, for now, I will just call it deployment tool.
The deployment tool has one purpose and that is helping you deploy any Windows VM with application role to any datacenter you want. The role can be a Citrix VDA or an FTP server or whatever you would like to deploy, the only thing it should require from you is knowing how to install the software you need silently so that we can do a fully automated deployment. Friday, I showcased the installation of a Citrix VDA with some standard applications that we see used all the time. The great thing about the two installations I showed is that the software deployed is the exact same installation no matter where you deploy them. In my demo, I showed how to install them on Azure and how to deploy them to XenServer on-premises. As you could see both VDA’s was installed without any issues and the application list and Citrix functionality was the same as well. It is this kind of consistency I want to help others gain as well.
Now my deployment tool is simple, but when deploying to Microsoft Azure there are a lot of fields that need to be filled out. If you use the XML file I showed you can save a lot of typing, but I do NOT recommend saving the passwords in the XML, I only did that to speed up the process since it was a demo.
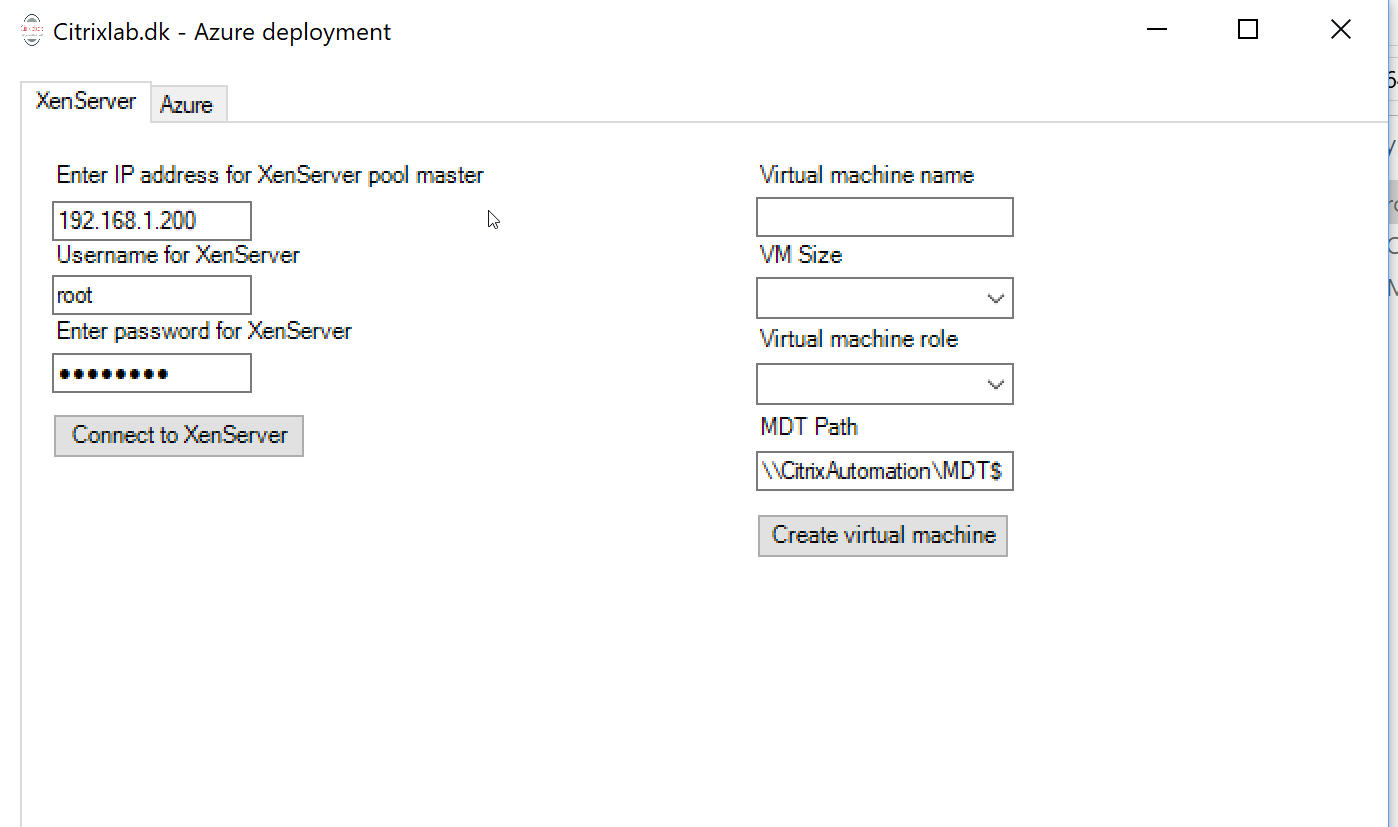
Let’s take a view of the deployment tool. Below is a picture of the XenServer tab in the tool, and as you see it is simple. On the left, we have the connection details like the IP for the Pool Master, username, and password. When all are entered in you click on “Connect to XenServer”. If the connection is successful you will see that in the status bar, and if not, that will be shown as well. On the right side you have the information details for the new virtual machine you are about to deploy, it needs a name, size, role, and path to the Microsoft Deployment Toolkit (MDT) server. When all information is entered you click on “Create virtual machine” and that kicks off the MDT build in the background. Now some of you may be thinking, how is this all linking into MDT, and the short version is that the role you select in the drop down is the ID on the task sequence in MDT. The deployment tool collects the MAC address from the new virtual machine and adds it to the customsettings.ini file in MDT and then all is in place.
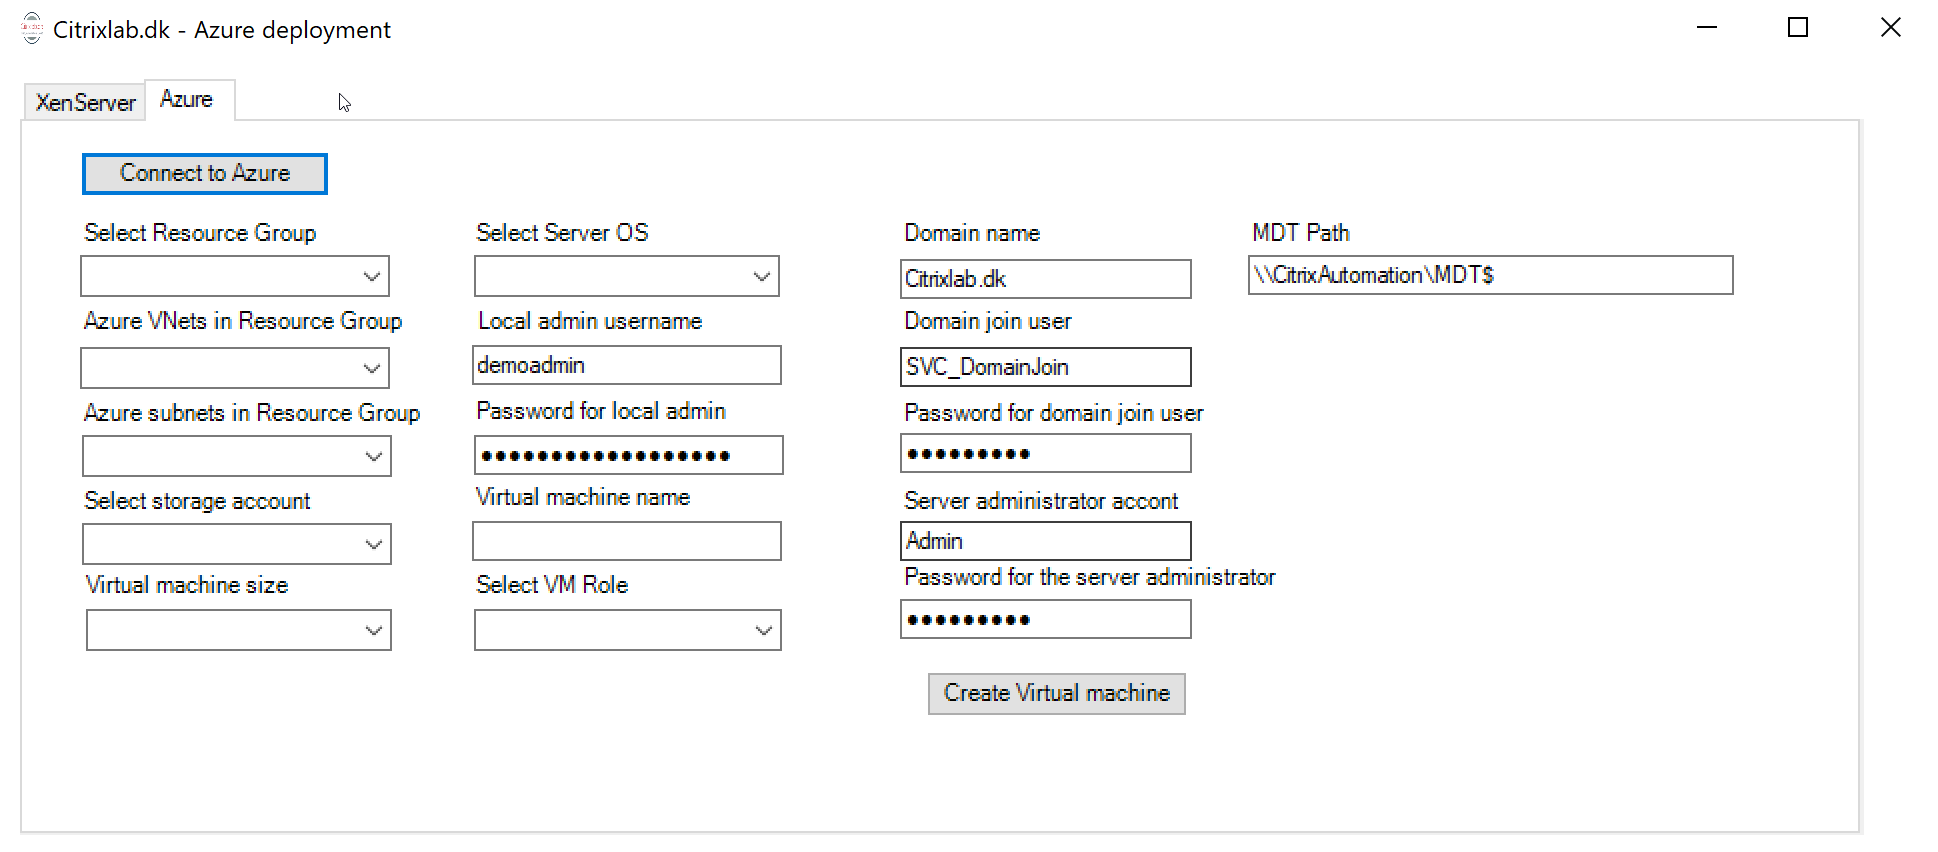
The second tab on the deployment tool is for Microsoft Azure. If you look on that screen you will see there are a lot more fields to consider, but if you have ever worked with Azure they should all be familiar, in fact, if they are not, you are not ready to use the deployment tool. Below is a screenshot of the Azure tab, and if we again start from the top left we have a button as the first “field”, this is the “Connect to Azure” button and that is the first thing that needs to be done. When you click the button, you are asked for your credentials to Microsoft Azure, and they, of course, need to be filled in correctly so that you can connect. When you have connected to Azure, you see that a lot of the fields are filled out automatically, but you still need to ensure that each field is correct. The fields are populated and the first item in each is shown, this might not fit what you want to install every time.
Under the connect button we have five fields, Resource group, vNet, Subnet, Storage account, and size. They are all drop down boxes so filling them out is simple. In the middle section, we have the following fields, Server OS, Local Admin username, Password for local admin, Virtual machine name and role. Again, the fields should make sense, and the role again points to the ID of the task sequence in MDT.
The third column is containing the following fields, Domain name, Domain join account, Password for domain join account, Server administrator, Password for server administrator. The domain join account is a service account with only permissions to join computers to the domain, the server administrator account is a domain user that has administrative rights on the new virtual machine so that it can access it remotely and kick off the task sequence from MDT.
On the far-right column, we have the MDT path, and this can be in either the datacenter that you are deploying to or if you have a fast-enough connection you can have it accessible via VPN or ExpressRoute. Important to know is that the installation should work on a slow connection, but you might be bored to death before it completes then 🙂
Lastly, we have the “Create virtual machine” button and yeah you guess it, it deploys the VM with the details you provided in the other fields.
So, this was the explanation blog post showing what I had in the webinar last Friday. I was asked if the tool would be a community tool and that is what I am expecting it to be. I won’t promise anything just yet, but since it is a spare time project I would like it to go back to the community so everyone who wants to can use it. When I get a bit more done on the deployment tool I will do another post going into more details about how to install it and make the connections between the tool and MDT.
When writing this post I got the idea that instead of having all the fields on one tab, would it makes sense to do a wizard instead so it doesn’t seem too overwhelming?
If you have any questions or feedback on this project feel free to reach out.
/Martin